Showing posts with label test automation. Show all posts

Friday, July 14, 2017

Learn Selenium (a Test Automation Tool) with C# - Part 2

In this part, we will learn how to a test application to do login Facebook automatically.

For beginning, I want to introduce about XPath. It is a major element in the XSLT standard. XPath can be used to navigate through elements and attributes in an XML document. You can read more about it on here.

In Selenium we will use XPath to find element(s) then make action according to the scenarios for testing.

If you are familiar with FireFox, you can use Firebug and FirePath add-on. They are very popular and strong tools for FireFox web developer. You just need to install them, open a website which you want to test, open Firebug >> click FirePath tab >> click the pointer and select an element on the page for getting its XPath value. See the following picture for example:


If your are familiar with Chrome, you can use XPath-Helper extension. But I recommend you use a built-in function of Chrome DevTools. Just open the website, press F12 then press Ctrl + F to enable DOM searching box. Using pointer to point an element then key a XPath value in to searching box for finding matched elements. If the matching is only 1, it is the XPath for this element.


For searching, you can try the first search with syntax:  .//*[@attribute-name='value']
For example a element having id="email", you can try: .//*[@id='email']

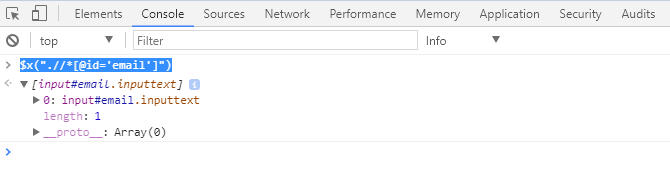
Another way on Chrome is using Console panel of Chrome DevTools with the function $x("XPath value"). For example: $x(".//*[@id='email']")

OK, that's enough for XPath. It's time to code our test application. Yes, let see the code first and I will explain later:

using OpenQA.Selenium;
using OpenQA.Selenium.Chrome;

namespace SeleniumTutorial
{
    class Program
    {
        static void Main(string[] args)
        {
            IWebDriver wd = new ChromeDriver(@"E:\working\abc\SeleniumTutorial");
            wd.Url = "https://www.facebook.com/";
            wd.Manage().Window.Maximize();
            wd.FindElement(By.XPath(@".//*[@id='email']")).SendKeys("your_email@domain.com");
            wd.FindElement(By.XPath(@".//*[@id='pass']")).SendKeys("your_password");
            wd.FindElement(By.XPath(@"//input[@value='Đăng nhập']")).Click();

        }
    }
}


Comparing with Part 1, the blue codes are new. In which:
wd.Manage().Window.Maximize(); ==> to maximize the browser window

Next 2 lines are for finding email box, password box and input (SendKeys) its values. The last line is for finding login button (it depends on the language used on the browser, mine is Vietnamese ). See below picture for more understanding:


Why I don't use @id to find login button? Because I recognize that Facebook changes this id frequently. So I use its value instead of.

Walking through Part 1 & Part 2, I believe that you have enough basic knowledge to start your automation test application with Selenium. Let's practice.

Happy coding! Any comment is welcome.


Thursday, July 6, 2017

Learn Selenium (a Test Automation Tool) with C# - Part 1

Selenium is a set of different software tools each with a different approach to supporting test automation. You can read more about Selenium via its website: http://www.seleniumhq.org/docs/01_introducing_selenium.jsp#introducing-selenium

Selenium has 2 version 1.0 and 2.0. During this article, I just mention about Selenium 2.0. Basically, it is used for testing web application by automation program written by Java, C#, Python... To do that, the test application (created by a tester) will control the browser which the web application (need to be tested) runs on via Selenium webdriver. The browser can be Chrome, FireFox, Internet Explorer... Each browser has a corresponding webdriver to control it.

In this post, I want to introduce Selenium with C#. To start, you must install MS Visual Studio - MSSV (2015 community is preferred) and download Selenium client & webdriver. Below are steps to create

1. Open MSVS and create new C# Windows project, see the following picture for example:

2. Add references for Selenium client & webdriver. There are 2 ways.
     2.1 Use Add Reference menu:


     2.2 Use Manage NuGet Packages menu:


I prefer 2.1 way. If you use Chrome Webdriver, you need to download the latest version from: http://chromedriver.storage.googleapis.com/index.html and unpack it into your project folder. Now you can create a simple test application.

3. Code your test application. Below is simple code for opening Chrome with google.com website
using OpenQA.Selenium;
using OpenQA.Selenium.Chrome;

namespace SeleniumTutorial
{
    class Program
    {
        static void Main(string[] args)
        {
            IWebDriver wd = new ChromeDriver(@"E:\working\abc\SeleniumTutorial");
            wd.Url = "http://google.com";
        }
    }
}


In which, @"E:\working\abc\SeleniumTutorial" is the folder containing Chrome Webdriver (chromedriver.exe).

Yeah! We already knew how to start a C# project with Selenium. I think that's enough for Part 1. In Part 2, we will learn more details how to code a test application with some real test scenarios, for example how to login Facebook automatically.

Any comment is welcome. Have a great day!

Subscribe to RSS Feed Follow me on Twitter!