Friday, December 22, 2017

C# SEO Tools for Google PageSpeed

PageSpeed is very important for ranking of your website on Google as also as it will get better experience for your customers when surfing your website. So Google provides its PageSpeed Insights tool which will give advices for optimizing your website. When you optimize your website meeting Google's requirements, you website will have higher score and may be your ranking will be higher. The acceptable score should be from 80 points (80 / 100).

There are many things which you need to do for meeting Google's requirements. However 2 things which impacts to your score most are image optimization and minifying JavaScript + CSS.

In this article, I'll introduce my SEO Tools (written by C#) for solving above matters. You can checkout the source code here: https://github.com/vnheros/c-seotools

The tool uses the following tools:
Below is the guideline for using this SEO Tools.

1. File XML configuration
Below is an example:
BackupSuffix is for copying the original .CSS or . JS file. For example: E:\test\big.js after optimizing ==> E:\test\big_Copy.js (containing original source code) and E:\test\big.js (minified code).
BackupOverwrite = 0 means every time running this tool, it will check and create a backup file with different suffix starting from _Copy1 to _Copy999; = 1 means all times running this tool, it only creates a backup file with suffix _Copy and overwrites it if existing.
DefaultOutPath is for out put folder (containing optimized images) in terms of you don't specify output folder in command.

2. Optimize only files listed in input file
You can use the following command:
SEOTools.exe -i input_file
For example: input_file is E:\test\files.txt. Output to a folder (e.g. E:\test\output), let use:
SEOTools.exe -i input_file -s subfolder -o output_folder
Subfolder is the folder containing image files for compressing, it is used for creating subfolders in backup folder.

3. Optimize all files in input folder (recursively)
You can use the command:
SEOTools.exe -i input_folder -t I -m FO
By default the tool will use Caesium, you can change to use ImageMagick by option -t I. As my experience Caesium gives smaller file size vs. ImageMagick, however ImageMagick runs faster than Caesium. Both also meets Google PageSpeed Insights.
With this tool, you can run after uploading images to your website or modifying CSS file / JavaScript file. Any comment is welcome.
Merry Christmas and Happy New Year!

Wednesday, December 6, 2017

Quick Start ElasticSearch on Windows

What is ElasticSearch?
ElasticSearch is a distributed, RESTful search and analytics engine capable of solving a growing number of use cases. It is built on top of Apache Lucene. It is commonly used for log analytics, full-text search, and operational intelligence use cases. As the heart of the Elastic Stack, it centrally stores your data so you can discover the expected and uncover the unexpected.

What will you get from this article?
In this article, I'll guide you how to install it on Windows, publish it with your domain, secure it. I also introduce to you first steps to combined it with Kibana and Logstash, so you can create a ELK system which can analyze a huge log data near real time.

Let's go!

Install Java Runtime
ElasticSearch requires Java runtime to run. To check if having Java on your Windows, let open cmd and key:
java -version
If you have no Java or the version < 8.x, let go to Oracle Java website for downloading and installing the latest version or from 8.x.

After installing, let create / update JAVA_HOME system environment variable, set it to the new folder installed Java runtime. For example:


Install & Configure ElasticSearch
Go to https://www.elastic.co/downloads/elasticsearch and download the zip file. Unpack into a folder, e.g. C:\ES

By default ElasticSearch is configured with a 1 GB heap. For real enviroment, this number is not enough. To set new heap size, you must create a system environment variable ES_HEAP_SIZE and set its value, e.g. 4g. This value depends on the memory size (RAM) of your server, it should be less than half of RAM (reference).

After setting new heap size, open C:\ES\config\elasticsearch.yml, set values for important parameters as the following:
# Path to directory where to store the data (separate multiple locations by comma).
path.data: F:\data
# Path to log files.
path.logs: F:\logs
# Lock the memory on startup.
bootstrap.memory_lock: true
# Upper limit on the fielddata. Old data will be evicted to make space for the new values if it is over the limit size. Can be set to a percentage of the heap size, or a concrete value like 5gb.
indices.fielddata.cache.size: 40%
# Set the bind address to a specific IP (IPv4 or IPv6).
network.bind_host: ["192.168.2.12", "localhost"]
# For ReadonlyREST

rest.action.multi.allow_explicit_index: false
Change the values of parameters upon your server. In which, parameter rest.action.multi.allow_explicit_index is reserved for ReadonlyREST tool which will be used for securing queries.

Start ElasticSearch by running bin\elasticsearch.bat file (e.g. C:\ES\bin\elasticsearch.bat). To set up ElasticSearch as a Windows service, run bin\elasticsearch-service.bat install then go to Windows services manager , find ElasticSearch service and change its Startup Type to Automatic.

After starting, let open a browser and check URL http://localhost:9200/ to see if it is working.

Install Logstash
Go to https://www.elastic.co/downloads/logstash and download the zip file. Unpack into a folder, e.g. C:\LS

Create a simple config file (e.g. logstash-simple.conf) in bin folder (e.g. C:\LS\bin) with a content as the following example to run Logstash.
input { stdin { } }
output {
  elasticsearch { hosts => ["localhost:9200"] }
  stdout { codec => rubydebug }
}
Then open cmd, go to bin folder & key below command for starting Logstash:
logstash.bat -f logstash-simple.conf
To make a Windows service for Logstash, you can use Non-Sucking Service Manager (NSSM) tool. Download latest NSSM from its download page, unzip it into a folder, e.g. F:\soft\nssm. Use cmd go to F:\soft\nssm\win64 and run the command:
nssm.exe install Logstash
Then you may fill in values as below and click Install service button:


After that, you can open Windows services manager to start Logstash service.

Install Kibana
Go to Kibana download page, download and unzip Kibana into a folder, e.g. C:\KB
Open config/kibana.yml file and configure some important parameters like:
# The URL of the Elasticsearch instance to use for all your queries.
elasticsearch.url: "http://localhost:9200"
# Time in milliseconds to wait for responses from the back end or Elasticsearch. This value
# must be a positive integer.
elasticsearch.requestTimeout: 30000

Run bin\kibana.bat in the installation folder (e.g. C:\KB\bin\kibana.bat) to start Kibana. Check http://localhost:5601 to see if Kibana works.


You can use NSSM to create a Windows service for Kibana. The above picture means no data has been shipped to Kibana yet. For shipping sample data into Kibana, you can try Winlogbeat which sends Windows event logs such as application events, security events, system events, etc. to Logstash.

Setup nginx to access ElasticSearch via a domain
With above configuration, you can only access ElasticSearch via localhost or IP 192.168.2.12. To access ElasticSearch via a domain, we can use nginx forward request to localhost (you can read my article on this link for how to installing nginx). Of course you can configure ElasticSearch directly on file C:\ES\config\elasticsearch.yml to allow to access it via a domain / public IP without using nginx, but I want to use nginx for allowing read only request to my ElasticSearch, for writing request I will setup for IP 192.168.2.12. This security will be done on ReadonlyREST tool in next step.

Below the configuration for nginx:
server {
        listen      *:80;
        server_name  yourdomain.com  www.yourdomain.com;
        location / {
            root your_web_site_root_folder;
            index  index.html index.htm;
        }
        location /es {
            proxy_pass http://localhost:9200;
            proxy_http_version 1.1;
            proxy_set_header Upgrade $http_upgrade;
            proxy_set_header Connection 'upgrade';
            proxy_set_header Host $host;
            proxy_cache_bypass $http_upgrade;
            rewrite ^/es/(.*) /$1 break;
        }
}
Now you can access ElasticSearch via yourdomain.com/es.

Setup ReadonlyREST tool
Go to https://readonlyrest.com/download.html, select your ElasticSearch version and download.
Open cmdcd to the ElasticSearch home and run the command:
bin/elasticsearch-plugin install file:///download-folder/readonlyrest-<version>.zip
For example, download-folder is C:\ES. After that, let create readonlyrest.yml file in the config folder of ElasticSearch (e.g. C:\ES\config/readonlyrest.yml). Then add rules in this file. For example, I want to allow anything from 192.168.2.12 and other hosts can read only, I can add the following rules:
readonlyrest:
    access_control_rules:

    - name: "Rule 1 - Allowing anything from localhost"
      hosts: [192.168.2.12]

    - name: "Rule 2 - Other hosts can only read certain indices"
      actions: ["indices:data/read/*"]
      indices: ["logstash-*"] # aliases are taken in account!

For more examples, you can read here to add configuration snippets into this file.

Finally, your ELK is ready for using in real life. Let enjoy it :)
Any comment is welcome!
See you next time.

Saturday, October 28, 2017

Setup chat bot (wrriten by MS Bot Builder NodeJS) with Nginx + HTTPS on Windows Server

Continuing with my series of articles on chat bot:
In this article, I will cover a solution to set up an production environment for your chat bot written by MS Bot Builder NodeJS with Nginx & HTTPS on Windows Server. In which, you can register your chat bot hosted on any server (not on Azure) with MS Bot Framework.

1. Install Nginx

Download the latest version for Windows from: http://nginx.org/en/download.html
Unpack it on a folder (e.g. C:\nginx ) and click nginx.exe to run nginx. Open your browser, run http://localhost/. If you see a screen like below, it means Nginx is running well.


2. Run your chat bot

Assuming that you've coded a wonderful chat bot, let run it.  For example, I have a super chat bot by echoing what user says, it is in app.js file as the following:
var restify = require('restify');
var builder = require('botbuilder');

// Create chat bot
var connector = new builder.ChatConnector({
    appId: 'app id of your bot on MS Bot Framework',
    appPassword: 'password of your bot on MS Bot Framework'
 });

// Receive messages from the user and respond
var bot = new builder.UniversalBot(connector, function(session) {
    session.send("You said: %s", session.message.text);
});

// Setup Restify Server
var server = restify.createServer();
server.listen(process.env.port || process.env.PORT || 5678, function() {
    console.log('%s listening to %s', server.name, server.url);
});

// Listen for messages from users
server.post('/api/messages', connector.listen());


Run app.js:
node app.js
Note that appId and appPassword will be replaced by your real values when you register your bot on MS Bot Framework.

3. Set up Nginx as proxy for your chat bot

Assuming that you want to run your chat bot on the link: yourdomain.com/bot. Open nginx.conf file (e.g. C:\nginx\conf\nginx.conf) and add a server configuration for your domain:
server {
        listen      *:80;
        server_name  yourdomain.com  www.yourdomain.com;
        location / {
            root your_web_site_root_folder;
            index  index.html index.htm;
        }
        location /bot {
            proxy_pass http://localhost:5678/api/messages;
            proxy_http_version 1.1;
            proxy_set_header Upgrade $http_upgrade;
            proxy_set_header Connection 'upgrade';
            proxy_set_header Host $host;
            proxy_cache_bypass $http_upgrade;
        }
}
Now you can open the chat emulator for testing with the link http://yourdomain.com/bot to see if it works (see section 3 of Create a Luis Chat Bot on Azure Bot Service - Part 1 for setting the emulator with ngrok):


4. Set up HTTPS

MS Bot Framework just allows to register a bot with HTTPS end point message. So that's why we need to set up HTTPS. Luckily, we can setup HTTPS with free SSL Certificate from Let's Encrypt. You can read my article WAMP 64 Bits + Free SSL (section 5) for how to create a free SSL certificate.

Below is the configuration on nginx for a server with SSL:
server {
        listen       443 ssl;
        server_name  yourdomain.com  www.yourdomain.com;
        ssl_certificate      C:/ProgramData/letsencrypt-win-simple/httpsacme-v01.api.letsencrypt.org/www.yourdomain.com-crt.pem;
        ssl_certificate_key  C:/ProgramData/letsencrypt-win-simple/httpsacme-v01.api.letsencrypt.org/www.yourdomain.com-key.pem;
        ssl_trusted_certificate C:/ProgramData/letsencrypt-win-simple/httpsacme-v01.api.letsencrypt.org/ca-<hex number>-crt.pem;
        ssl_session_cache    shared:SSL:50m;
        ssl_session_timeout  1d;
        ssl_ciphers EECDH+AESGCM:EECDH+AES;
        ssl_prefer_server_ciphers  on;
        location / {
            root your_web_site_root_folder;
            index  index.html index.htm;
        }
        location /bot {
            proxy_pass http://localhost:5678/api/messages;
            proxy_http_version 1.1;
            proxy_set_header Upgrade $http_upgrade;
            proxy_set_header Connection 'upgrade';
            proxy_set_header Host $host;
            proxy_cache_bypass $http_upgrade;
        }
}
Test again on the emulator with https://yourdomain.com/bot

5. Register your bot

Go to https://dev.botframework.com, sign in and click My bots menu for registering your bot. Remember to select Register an existing bot built using Bot Builder SDK when creating new bot.
It will open a page for you keying your bot info. Note that Messaging endpoint is https://yourdomain.com/bot.
Click Create Microsoft App ID and password to create app id & password for your bot. Paste your app ID to the required box then copy the app id & password into the source code of your bot (e.g. appIdappPassword in section 2). Save the setting.

Now you can click Test button on top right for testing your bot directly from the website https://dev.botframework.com. For example:


You can also connect your chat bot to other channel like Facebook (see Create a Luis Chat Bot on Azure Bot Service - Part 2 for how to connect with Facebook).

Alright, you have known how to set up a production environment for your chat bot which can be hosted any where.

Have fun! Any comment is welcome.
Sunday, October 15, 2017

MS SQL SMS export large data to Excel without breaking format

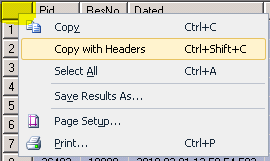
If you often work on MS SQL, surely sometimes you want to export large data (result a query) to Excel file. After querying on MS SQL SMS (Microsoft SQL Server Management Studio), you can use right click on the cell top left then select "Copy with Headers" and copy to Excel file or "Save Result As" and save to a CSV file.


However 2 these functions have their problems. "Copy with Headers" cannot copy large data.  "Save Result As" often breaks CSV format if your data contains some special characters.

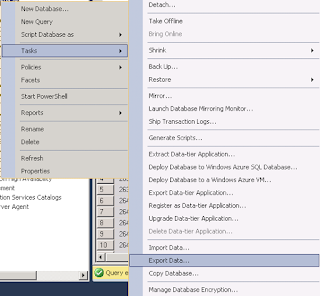
Fortunately, there is another function for exporting large data without breaking its format. Right click on your database and choose Tasks >> Export Data...


For Data Source, choose SQL Server Native >> select Server name >> select your Database, see the following for example:


Next, select Destination as Microsoft Excel & specify Excel file path.


Next, select Write a query to specify the data to transfer.


In next step, paste your query into or select a file containing your query. In the step Review Data Type Mapping, let review again columns have been converted data (Source Type vs. Destination Type). If you want to fix, click Back to select again Destination Type for converting.

If they are ok, click Next then Finish (don't worry for warning signs). Waiting a moment and you will have your Excel file with correct format you wanted.

Yeah! This is a small tip for you, hope it is useful. Share it to your friend for helping him or her out 😍. Any comment is welcome!

Happy Halloween!

Friday, September 29, 2017

Ionic 3: Debugging on VS Code and Chrome

After long time, since from my first post Quick start your mobile app with Ionic,  now I have a project using Ionic. So I want to share this post to my team for how to debugging on latest Ionic 3. Because saving debug time means you will delivery the application faster.

As beginning, I want to brief important things for starting with latest Ionic 3:
npm install -g ionic cordova
  • Start an app with command (cutePuppyPics is your app name/project)
ionic start cutePuppyPics tutorial
OK, you are ready to code! But wait, let setup to debug for your app on Chrome firstly. Open your app on VS Code and do the following steps:

1. Press F5 >> select Chrome:


2. Edit file launch.json generated with content like below:
{
    "version": "0.2.0",
    "configurations": [
        {
            "type": "chrome",
            "request": "launch",
            "name": "Launch Ionic on Chrome",
            "url": "http://localhost:8100",
            "sourceMaps": true,
            "webRoot": "${workspaceRoot}/src"
        },
        {
            "type": "chrome",
            "request": "attach",
            "name": "Attach Ionic on Chrome",
            "url": "http://localhost:8100",
            "port": 9222,
            "sourceMaps": true,
            "webRoot": "${workspaceRoot}/src"
        }
    ]
}
For Ionic 4, let use ${workspaceFolder} instead of ${workspaceRoot}/src.

3. If you use Windows, let open Properties of Chrome's short cut, and add --remote-debugging-port=9222 in to Target box:


For Mac, let use same debug flag as Windows. This debug flag is used for attaching your Ionic app into existing Chrome running.

4. Press Ctrl+` to open VS Code terminal, key:
ionic serve -b
It will build the app and start the server (http://localhost:8100/) but don't launch browser (-b option).

5. Close all Chrome opened, click debugger icon >> select Launch Ionic on Chrome option >> open a file, for example cutePuppyPics\src\pages\list\list.ts, set break point and press F5. It will launch the app on Chrome and display a debug player on the top of VS Code. In this example, when you click My First List menu and hit an item, it will jump to the break point for debugging, see the following picture:


You can stop the debug by pressing Shift+F5 or stop buttonon debug player. Stopping the debugger doesn't stop the app, it is still running until you press Ctrl+C in terminal.

6. In case you want to debug dynamically, you can attach the debugger into the app is running on Chrome. To try, let open Chrome and key http://localhost:8100 to running the app. Then go to VS Code >> click debugger icon >> select Attach Ionic on Chrome option >> click run (or press F5). It will open a debug player like below, and when you click an item in My First List page, it will jump to the break point.


7. You can change source code and see this change updated to running app on Chrome. That's great point of Ionic which can help to speed up developing your application. I love it due to this live update feature.

Happy coding! Any comment is welcome.

Saturday, September 16, 2017

WAMP 64 Bits + Free SSL (Let's Encrypt)

WAMP likes XAMPP, they are free tools packaged Apache, MySQL / Maria DB & PHP together. XAMP also has other services / applications such as FileZilla, Mercury & Tomcat and it also can run on Linux & OS-X. While WAMP just runs on Windows. However for Windows' users, I recommend WAMP because it is designed for Windows only, so it has some advanced features for Windows but XAMPP doesn't have, especially it has Windows 64 bits version while XAMPP has only 32 bits version for Windows.

1. Install

To install Wamp 64 bits, you can download it from wampserver.aviatechno.net. You should install it as Administrator. You also must install all Visual C++ redistributable packages (x86 + x64) (32bits  + 64bits) for running Wamp 64.

After installing & running, if its system tray icon is green, it's ok. Let choose versions for Apache, PHP & MySQL which you want for your websites.


2. Configure auto start up

For live server, you need to configure Apache & MySQL auto start up when the server restarts.
Go to Windows Services, find wampapache64 & wampmysqld64 services then set them Automatic startup.


Next, right click on Wamp tray icon, select Wamp Settings menu >> select Wampserver Homepage at startup.


3. Enable SSL (HTTPS)

The latest Wamp 64 has already included Open SSL built-in, so you don't need to install Open SSL. Below are steps to enable it for Apache:

  • Open httpd.conf file, uncomment the following lines:
LoadModule ssl_module modules/mod_ssl.so
Include conf/extra/httpd-ssl.conf
LoadModule socache_shmcb_module modules/mod_socache_shmcb.so

  • Open php.ini file, uncomment the following line:
extension=php_openssl.dll

4. Add virtual host for your website

Open httpd-vhosts.conf file and add a virtual host running on HTTP (port 80) for your website, below is an example:
<VirtualHost *:80>
 ServerName mydomain.com
 ServerAlias www.mydomain.com
 DocumentRoot "c:/mywebsites/www.mydomain.com"
 <Directory  "c:/mywebsites/www.mydomain.com/">
  Options Indexes FollowSymLinks
        AllowOverride all
        Order Deny,Allow
        Allow from all
        Require all granted
 </Directory>
 ErrorLog "logs/mydomain.com-error.log"
 CustomLog "logs/mydomain.com-access.log" common
 Alias /.well-known c:/mywebsites/www.mydomain.com/.well-known
</VirtualHost>
In which, .wellknow folder will be used to store a key to challenge with Let's Encrypt server for creating your free SSL certificate in next step.

To check if you made right syntax, open cmd tool, go to Apache bin folder and run:
httpd –t
If the syntax is correct, let restart Apache service, then check your website on a browser. You can read my article "Creating Multiple Virtual Sites on a WAMP Server" for more info on creating virtual hosts.

5. Create free SSL certificate with Let's Encrypt

You can read my article Free SSL Certificate with Let's Encrypt to know about Let's Encrypt and tools to create free SSL certificate. In this post, I will show you how to do this with letsencrypt-win-simple tool.

Download latest letsencrypt-win-simple tool from its release page. Unpack it into a folder, for example: C:\letsencrypt-win-simple. Open cmd tool as Administrator, cd to this folder and run letsencrypt.exe, its interface will show as below:


Key N then key 4, it will ask you enter host names (domain names) as the following screen:


Let key your domain name, for example: www.mydomain.com, then it will require you enter the root folder containing your website, for example: c:\mywebsites\www.mydomain.com. After that, the tool will do a process to create a key in the folder c:\mywebsites\www.mydomain.com\.well-known\acme-challenge, then challenge with letsencrypt.org to authorize and create certificates. These certificates are in the folder: C:\ProgramData\letsencrypt-win-simple\httpsacme-v01.api.letsencrypt.org. We will use them to create virtual host running on port 443 (HTTPS).

On finishing, the tool will ask you to create a scheduled task running on 9 am every day to renew your certificate automatically when it is used 60 days (30 days before expiry), see the following picture. With this scheduled task, you can sleep well :)


6. Add virtual host HTTPS for your website

Now you are ready to up & run your HTTPS website, let create a virtual host running on port 443 with SSL certificates for it, see the following example:
<VirtualHost *:443>
 ServerName mydomain.com
 ServerAlias www.mydomain.com
 DocumentRoot "c:/mywebsites/www.mydomain.com"
 <Directory  "c:/mywebsites/www.mydomain.com/">
  Options Indexes FollowSymLinks
        AllowOverride all
        Order Deny,Allow
        Allow from all
        Require all granted
 </Directory>
 ErrorLog "logs/mydomain.com-error.log"
 CustomLog "logs/mydomain.com-access.log" common

 SSLEngine on
    SSLCertificateFile "C:/ProgramData/letsencrypt-win-simple/httpsacme-v01.api.letsencrypt.org/www.mydomain.com-crt.pem"
    SSLCertificateKeyFile "C:/ProgramData/letsencrypt-win-simple/httpsacme-v01.api.letsencrypt.org/www.mydomain.com-key.pem"
    SSLCertificateChainFile "C:/ProgramData/letsencrypt-win-simple/httpsacme-v01.api.letsencrypt.org/ca-<hex code>-crt.pem"
</VirtualHost>
Restart Apache service then check https://www.mydomain.com on a browser (for example Chrome). If it has the symbol https with green, it's ok. Congratulation!

7. Make some securities for Wamp 

Remember to restart Wamp's services after configuration 😃

7.1 Hide server info to prevent bad guys mining it

Open httpd-default.conf file, find & change parameters the following:
ServerSignature Off
ServerTokens Prod
7.2 Make sure  directories / files outside of the document root (website) are not allowed to access

Open httpd.conf file, check if the content of directory tag is like the following:
<Directory />
     Order Deny,Allow
     Deny from all
     Options None
     AllowOverride None
</Directory>
or
<Directory />
     AllowOverride none
     Require all denied
</Directory>

7.3 Reduce time out to prevent DoS attacks

Open httpd-default.conf file, find & set the following parameter:
TimeOut 60
You can set it less than, for example 30.

7.4 Set password for MySQL
  • Left click Wamp's system tray icon.
  • Select MySQL > MySQL console menu.
  • Press Enter on the console opened.
  • Key SET PASSWORD FOR root@localhost=PASSWORD('your_password'); (change your_password to your private password). They press Enter.
7.5 Change permissions for folders in your website

Normally, I prefer to set all folders in my website to allow Read & Execute permission only except some folders having Write permission. To check what user runs Apache, let open Windows Task Manager and click Details tab, and see in User name column:


It often is SYSTEM user. To remove Write permission, right click on your web root folder >> select Properties menu >> click Security tab >> click Edit button >> select SYSTEM user >> on Write permission row, untick on Allow column, tick Deny column:


If you cannot edit on Allow column, back to your web root folder >> select Properties menu >> click Security tab >> click Advanced button >> click Disable inheritance button on SYSTEM user having Full control access inheriting from parent folder. Then you can edit in above step.

For folders which you need to write (upload), just enable Write permission for SYSTEM user on those folders.

That's all for tonight. Bye and see you next post. Any comment is welcome!
Good night!


Thursday, August 17, 2017

Joomla 3: setup to allow registered user to create a post in frontend

Froom Joomla 3.x, you can setup to allow registered user to create a post in frontend without installing any third party extension. Below are steps:

1. Setup ACL (Access Control List) to allow Registered user to create article. Go to System >> Global Configuration >> Articles >> Permission, set Action of Registered to Allowed:


2. Create a menu in frontend for user posting. Remember to select Menu Item Type as Articles >> Create Article and select Access right as Registered:


Now your registered user can create a post, by logging in and clicking the menu (e.g. Create a Post):


However, you should do more steps to customize TinyMCE editor as also as allow user posting HTML content (by default registered user can only post plain text).

3. Enable registered user posting HTML content. Go to System >> Global Configuration >> Text Filters, set Registered group to No Filtering:


4. Customize buttons of TinyMCE editor. Go to Extensions >> Plugins, search TinyMCE then click to configure it:

Open Set 1, drag & drop buttons which you want to appear in the editor for registered user:


To allow empty tags (e.g. <div class="my control class"></div>) in the input content, you can set a value div[*] for Extended Valid Elements field of the TinyMCE editor plugin.

To disable / enable editor xtd buttons like Article, Image etc., you can search its plugin then configure them. For example, to disable button Article (last picture in step 2) for registered user, go to Extensions >> Plugins, search article then click to configure its Access to Special:

5. To receive a notification email when a user create new article, you can use NotificationAry plugin. It is free, just install and enable it. Here is mine:


Yeah! Now you can setup a blog with many users can create articles from frontend then you will get an email notification when having new article and able to approve (publish) it via the link inside the email.

Have dream website! Any comment is welcome!


Thursday, August 3, 2017

Joomla 3.x: Create home page with different content for guests & registered users

When you develop a web application by Joomla 3.x, you may have a need to customize a page with different content for guests & registered users.

For example, I will create a sample web site with different top menu and home page content for guests & registered users. Below are steps:

1. Install & enable OSD Content restriction plugin. This plugin will help to create content in articles based on user access group. So we will use it to load different content for user groups.

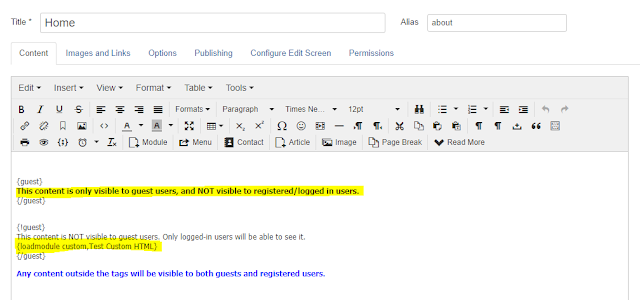
2. Create an article for home page. In this article, we input content for guest and non-guest. The following sample will show "This content is only visible to guest users, and NOT visible to registered/logged in users." for guest, and show "This content is NOT visible to guest users. Only logged-in users will be able to see it."  plus the content of a customize HTML module for non-guest (logged user):

3. Create a menu for guest, e.g. Guest Menu. Set up Home menu as Single Article pointing to the article in step 2.

4. Create a menu for non-guest, e.g. Author Menu, all its menu items are set to Registered or other group required logged. Here is a sample:

5. Create modules for showing Guest Menu & Author Menu, put them in same position. Set Access of Guest Menu to GuestAuthor Menu to Public.


6. Done! Let see the home page for guest:

7. Here is the home page for non-guest (logged user):

Yeah! Based on this, you can do what ever you want. Good luck.

Any comment is welcome!

Sunday, July 23, 2017

Playing with template in Joomla 3.x

Template is the heart of Joomla. Almost of things which you need for your website, just do them in your template. In the template, you can override other extensions (components & modules)  without touching to their source code. So you can easily update new versions of the extensions or Joomla without impacting to the front end of your website. This is very important because Joomla community often releases security fixes which you should update immediately for your website if any.

In this article, I will collect & introduce to you some tips which you can play with Joomla's template to setup your website beautifully, quickly and security.

1. Uninstall unnecessary templates

If you don't use a template, let remove it. Less code that means your website is more lightweight, faster and more security. Below the steps to install a template:
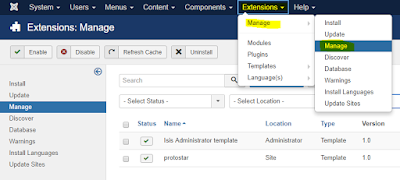
  • Go to menu Extensions >> Manage >> Manage
  • Click Search Tools button >> select type as Template >> click the check box of a template wanted to install >> click Uninstall button.

This will remove permanently all source code of the template from your site.

2. Edit source code of a template, code your website on mobile devices

Joomla 3.x provides an editor for editing source code of any template. It is very powerful. I think it is a strength of Joomla against the other CMS. With this editor, you can code your website when you are travelling on mobile devices like smart phone or tablet.
To open the editor for your template, go to Extensions >> Templates >> Templates >> click on the template name:
It will open a screen with files & folders of source code in left side. Here you can do many actions via buttons on the top. Click Documentation button if you want to learn more about this editor. To edit a file, click on its name:


Above are buttons I often use. The right side is source code of selected file. To change for editing the other file, just click on its name. Soo cool 👍

3. Compile LESS file

Another weapon of Joomla is it supports to compile LESS file directly on the template editor. You don't need to install any extra tool. To know what is LESS, let read: http://lesscss.org.

LESS files are often in less folder. If you open a LESS file on the editor, it will show Compile LESS button. After compiling, it will translate into a CSS file corresponding with LESS file in css folder. The template file uses CSS file to present its styles.


4. Create overrides for extensions

In manual way, you must copy the original PHP file from the source of extension into a proper place in your template directory. The correct directory structure for your override file is:
templates/TEMPLATE_NAME/html/EXTENSION_NAME/VIEW_NAME/FILE_NAME.php
You can read here for an example.

However in Joomla 3.x, you can also create overrides for extensions by clicking Create Overrides tab then click an extension (module, component, layout) which you want to override in the template manager.


5. Customize Protostar template

As a beginner of Joomla template coding, one of the fastest way is studying & customizing an existing template. What is good template for you starting? I recommend the Protostar template. It is one of the two front-end templates included with a Joomla 3.x source code. Protostar likes a blank responsive template, it is simple but displays well on many devices. So you can build your own template from this template with a basic knowledge about PHP, JavaScript & CSS.

In this section, I give an example on how to create a mobile menu which displays all submenus without touching on parent menu. By default, a submenu will be showed when hovering on parent menu. You can do this action on desktop with mouse, but cannot in a mobile with touching screen. It causes your submenu is never reached on the mobile.

By adding below code into template.less file (in @media query for mobile screen) and re-compile it in the template editor, you will have a proper menu on mobile:

@media (max-width: 480px) {
//start changes
    .navigation .nav-child {
        display: block;
        position: unset;
        float: unset;
        border: unset;
        box-shadow: unset;

        &:before {
            display: none;
        }
    }
    .navigation .nav > li > .nav-child {
        &:before {
            display: none;
        }
    }
//end changes
    .item-info > span {
        display:block;
    }
    .blog-item .pull-right.item-image {
        margin:0 0 18px 0;
    }
    .blog-item .pull-left.item-image {
        margin:0 0 18px 0;
        float:none;
    }
}

Here are screens for desktop and mobile:

It's time to go to bed. Bye everyone! Any comment is welcome.

Subscribe to RSS Feed Follow me on Twitter!