Wednesday, December 28, 2016

Windows Server 2012: turn off auto restart after logging in

By default Windows Server will auto download new update and auto restart after you log in if the update requires to restart the server. This can cause some unwanted problems such as some applications cannot run after restarting, users complains etc.
You can change this default behavior by policies in Local Group Policies. Below are steps:
  1. Press Windows Key + R to open the run prompt.
  2. Type "gpedit.msc" and press enter.
  3. Navigate to Computer Configuration >> Administrative Templates >> Windows Components >> Windows Update.
  4. Enable the "Configure Automatic Updates" policy and set it to "2 - Notify for download and notify for install".
  5. Enable the "No auto-restart with logged on users for scheduled automatic updates installations" policy.

See the following image for example:

Have a good time!
Happy new year!

Wednesday, November 23, 2016

ETL and Build Data Warehouse with SSIS - Part 2

This article is a continue of Part 1. Here I will show you how to Parameterize, Load Data Into Destination Using Look up, Deploy SSIS Package on SQL Server and Create Agent Job.

1. Parameterize

In the sample of merging Excel file with data table, we have 2 connections: Excel Connection (for reading data from Excel source file) and OLE DB Connection (for reading data from data table source). These connections can be changed especially when you deploy your SSIS Project on SQL Server. So it needs to be parameterized.

To parameterize a connection, let right click on it (in the bottom of a design screen of a package) the select Parameterize:
In the screen showed up, let specify values for the connection parameterized. As my experience, connections should select as Project level (apply for all packages in the project) and Required (to make sure it must be set before executing a package):

After that, you can see the parameter created in Project.params. You can add other parameters in here. For example, I added 2 new parameters Sell_StartDate and Sell_EndDate to use in next section:


2. Load Data Into Destination Using Look up

In this section, we will transform products sold in a period from SSIS_Demo_Products table to new table SSIS_Demo_Products_Report (assume that it will be used for report purpose). But before loading data into SSIS_Demo_Products_Report, we will look up its data to check if existing data matches with new data or not. Then we will insert or update data.

First, create New SSIS Package (e.g. LookupAndLoad.dtsx) >> drag Data Flow into >> double click >> drag OLE DB Source into >> configure it:

Note: We use $Project::Sell_StartDate and $Project::Sell_EndDate parameters (created from above step) for SQL command.

Drag Lookup task into, connect OLE DB Source to it then configure it:

Note: we just need to lookup on ID column.

Now we drag OLE DB Destination into >> connect Lookup to it >> select its input as Lookup No Match Output containing new records >> configure it as below to insert new records into SSIS_Demo_Products_Report:

Next, let drag OLE DB Command into >> connect Lookup to it >> select its input as Lookup Match Output containing existing records >> configure it as below to update existing records:

After done, we have final diagram of Data Flow as the following:

Here are tables before right click Execute Task:
And after executing task:

2. Deploy SSIS Package on SQL Server

2.1 Create an SSISDB catalog, if you haven’t already. Below are steps:
  • Open MS SQL Server Management Studio.
  • Connect to the SQL Server Database Engine.
  • In Object Explorer, expand the server node, right-click the Integration Services Catalogs node, and then click Create Catalog.
  • Click Enable CLR Integration. The catalog uses CLR stored procedures.
  • Click Enable automatic execution of Integration Services stored procedure at SQL Server startup to enable the catalog.startup stored procedure to run each time the SSIS server instance is restarted. The stored procedure performs maintenance of the state of operations for the SSISDB catalog. It fixes the status of any packages there were running if and when the SSIS server instance goes down.
  • Enter a password, and then click Ok. You'll see this catalog under Integration Services Catalogs. (Make sure SQL Server Integration Services is started).
2.2 Build SSIS project. On MS Visual Studio, right on your solution and Build Solution. Goto bin\Development folder of your solution, then copy .ispac file (e.g. SSIS Demo.ispac) to SQL server.

2.3 Deploy SSIS project to SQL server. On MS SQL Server Management Studio, right click on SSISDB catalog >> select Create Folder >> input folder name (e.g. SSIS_Demo) and click OK >> click on new created folder >> right click on Projects >> select Deploy Project >> click Next button on the popup windows >>  Browse to select .ispac file >> click Next button to deploy, it may show a warning, just click OK to skip >> click Next button >> last step, click Deploy button then click Close button:

2.4 Create Environment & setup Parameters.
  • Explore new created folder (e.g. SSIS_Demo) >> right click Environments >> select Create Environment >>:
  • Give it a name (e.g. Development), then click OK:

  • Right click on new created environment (e.g. Development) >> select Properties: >> click tab Variables >> copy and paste the names & values of parameters in SSDT to here >> then click OK:


Note: For parameter of connection string (e.g. ExcelConnectionManager_ConnectionString), you should change the value to new source.
  • Configure parameters of the project. Right click on the project (e.g. SSIS_Demo) then select Configure >> add Development environment into References >> open Parameters section >> choose corresponding variable from the environment:

  • Let execute packages to see if it works. Right click on a package and select Execute. It will alert to choose a correct environment:

3. Create Agent Job

The last step is to set up an Agent Job to run a package on a schedule. Make sure that SQL Server Agent service is running. Below is series of images for creating an Agent Job:

After creating the job, let check if it can work:

Done! Now you can start to build your Data warehouse!

Good luck. Any comment is welcome.

Wednesday, November 16, 2016

ETL and Build Data Warehouse with SSIS - Part 1

1. What is ETL?

E = Extract data from a data sources such as a database, a CSV file, a Excel file, etc.
T = Transform the data extracted. It can include processing, cleaning, converting extracted data to new data model.
L = Load the data into a destination source such as a data warehouse, a database, a file, etc.

2. Data warehouse and BI solution

Data warehouse is a system used for reporting and data analysis, and is considered a core component of business intelligence (BI) (ref: https://en.wikipedia.org/wiki/Data_warehouse).

Nowadays, there are a lot of tools supporting you to build your BI solution such as: Jaspersoft ETL, Talend, etc. After trying some tools to build my BI solution, I see that a tool of Microsoft - SQL Server Integration Services (SSIS) is the one of the best tools for doing this. So I want to share my experiences on using SSIS in this post.

3. Setup SSTD for MS Visual Studio
To create SSIS packages, you must have SQL Server Data Tools (SSTD). It is a set of tools for MS Visual Studio. If you don't install MS Visual Studio (MS VS), let download MS Visual Studio 2015 Community version (free), then download SSTD from here: https://msdn.microsoft.com/en-us/mt186501.aspx

4. Create new Integration Services Project
After setting up SSTD for MS VS, you can create new Integration Services Project. In MS VS go to menu File >> New >> Project, then expand Templates >> Business Intelligence >> select Integration Services Project, like below picture:


5. Structure of an Integration Services Project and Tasks
Solution Explore (in right side) of a project is like below:
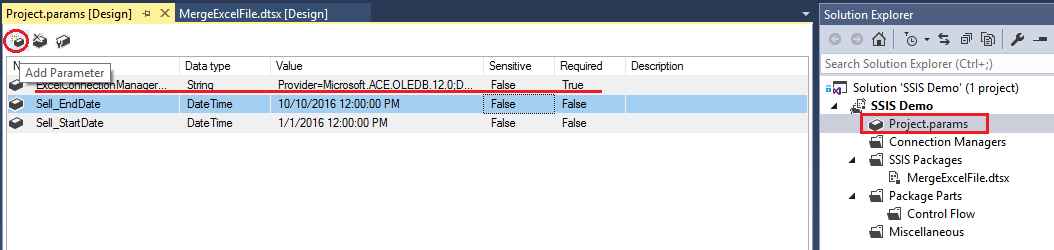
+Project.params: containing parameters for the project. The parameters will be input when executing a SSIS package. They can be input from Environment Variables which are set up in a deployment environment. You can double click it and add new parameter.
+Connection Managers: containing connection to data sources used in the project. You can right click to New Connection Manager.
+SSIS Packages: containing SSIS packages. A Package is a set of tasks and flows for an ETL purpose. You can right click to New SSIS Package.

There are many tasks for Control Flow of a package as you can see in the left side when opening it (see the following picture). Normally almost package starts with Data Flow Task:


For another tasks, you can read here: https://msdn.microsoft.com/en-us/library/ms139892(v=sql.120).aspx

6. Sample: merge an Excel file to a data table
Via this sample, you can know how to merge data (update existing and insert new one) from an Excel file with a data table.
Assuming that we have a data table SSIS_Demo_Products as the following:

And its data:
Here is the content of the Excel file - SSIS_Demo_Products.xlsx:

On MS VS, create new Integration Services Project (for example, you can name it as SSIS Demo) ==> then create New SSIS Package (for example, you can rename it to MergeExcelFile.dtsx) ==> drag Data Flow Task into Control Flow of MergeExcelFile.dtsx ==> double click Data Flow Task ==> drag Excel Source and OLE DB Source into the Data Flow:


Double click Excel Source ==> create New Excel Connection Manager:


Double click OLE DB Source ==> create New OLE DB Connection Manager:


And configure other sections like below:


Note: in OLE DB Source, we just need ID column to compare if the record is existing or not.

To compare and merge, Excel columns' data type must be same with columns of SSIS_Demo_Products data table. Let drag Data Conversion into for converting Excel data. Connect blue line of Excel Source with Data Conversion, then double click Data Conversion to configure it:


Now your data is ready to merge. But wait. We should sort data of both Excel file and source data table to boost up performance when merging. Drag 2 Sort tasks into this Data Flow then connect Data Conversion with one and OLE DB Source with other. You can rename them to Sort Excel and Sort DB Source as below:


Here is the configuration of Sort Excel:

and Sort DB Source:

OK, now drag Merge Join into ==> connect Sort Excel to it:
Connect Sort DB Source to Merge Join ==> double click Merge Join to configure it:

Note: we use Left outer join and Join Key between converted.ID and ID

As result of Merge Join, we will have a data with records having ID = NULL if records in Excel file doesn't exist in data source. So by using Conditional Split task, we can split into New Record and Existing Record easily, let drag Conditional Split into then configure it as below:

Yeah, it's time to load the data again SSIS_Demo_Products table. Let drag OLE DB Destination into then connect with Conditional Split via NewRecord output:
Configure OLE DB Destination it to insert new record into SSIS_Demo_Products table:


To update Existing Record, let drag OLE DB Command into ==> with Conditional Split via ExistingRecord output ==> configure it as below:

Note: the SQLCommand as below:
UPDATE SSIS_Demo_Products
SET ProductID = ?,
ProductName = ?,
SellDate = ?,
UnitPrice = ?,
Quantity = ?,
Buyer = ?
WHERE ID = ?


The final diagram of Data Flow is below, right click then Execute Task then see data of SSIS_Demo_Products table updated and inserted:

That's enough for Part 1. I'll publish Part 2 ASAP, in which I'll present how to Parameterize, Load Data Into Destination Using Look up and Deployment SSIS Package on SQL Server.

Let check it out! Happy coding!

Here is Part 2.
Subscribe to RSS Feed Follow me on Twitter!