Showing posts with label blogger. Show all posts

Tuesday, July 29, 2014

Moving Blogger to joomla

Joomla is a powerful CMS, it lets you make your website/blog running in your way with professional look and feel. And you may have dozen reason to migrate your blog from blogger.com to Joomla if you know Joomla and you have an existing blog on blogger.com.

In this article, I'll share you my experience when I migrated my blog to Joomla. First of all, you should have a plan and overview SOP. Below is my simple SOP:


1. Prepare new Joomla website

I like Joomla 3.x, so I installed latest Joomla version with blank content. Then I choose a template that I love then install it to the new Joomla site.

2. Export / Import content from Blogger to Joomla

There are many ways to do this. You can export XML content from Blogger then import it to Joomla. However I prefer to use FeedGator component to import articles from Blogger to Joomla. FeedGator is free component and you can download here. It imports RSS feedsinto your Joomla! database as content items. It supports full text importing. For Joomla 3.x, you should download FeedGator 3.0 alpha3. Although it is in test phase but you can use it for this importing purpose with my fix here.

After installing, open menu Extensions >> Plugin Manager then enable FeedGator - Joomla Native Content Plugin. Before importing, you should create a category for  imported articles. Go to Content >> Category Manager ans create one (e.g. Joomla!). Now it's time to add the feed of your blog. Open Components >> Feed Gator >> Manage Feeds, click New button to add new feed. Below is a sample screen shot:

In which, Feed URL is gotten from the RSS feed at the bottom of your blog where has Subscribe to: Posts (Atom) link. In above picture, it is my blog RSS feed: http://blog.vivavivu.com/feeds/posts/default. The next is Publishing tab, you can set as the following:

In Text Handling tab, remember to choose Get Source Full Text as Yes.

If you want to download images to Joomla website, let set as below in Images and Enclosures tab:

Because you migrate your blog, so let link back (track back) option in Links tab as No:

You can change another configurations if needing, then click Save & Close button. To import, select the feed which is just created, then click Import button, see the following picture for example:

3. Organize new content on Joomla

After importing content from your blog to Joomla, let check the imported content, imported images. You may edit a little to adapt your articles with new template on Joomla. You may change the structure of menus etc.

4. Redirect 301 old URLs on Blogger to new URLs on Joomla

To keep Google ranking for your articles, you should make 301 redirection from old URLs on Blogger to new URLs on Joomla.

If your blog don't have private domain/sub domain, let configure a private domain/sub domain for it before you migrate. Keep your blog run at least 2 weeks on the private domain/sub domain, it helps Google migrate rankings from its blogspot.com to this private domain/sub domain (e.g. blogger.yourdomain.com).

There are 2 cases for this situation:

  1. You want to keep current domain (blogger.yourdomain.com).
  2. You want to move to new domain (e.g. joomla.yourdomain.com)

4.1 Keep current domain

There are many solutions, below is my way:

  1. Move your old blogger domain (blogger.yourdomain.com) to a real host (support PHP + MySQL)
  2. Install Joomla for the domain
  3. Import old content to a category
  4. Use Redirect component of Joomla (menu Components >> Redirect) to redirect all old URLs to new URLs
  5. After 2 weeks, let check Google search

4.2 Move to new domain

Below are steps:
  1. Install new Joomla on another domain/sub domain (e.g. joomla.yourdomain.com). 
  2. Import old content to new Joomla website
  3. Move your old blogger domain (blogger.yourdomain.com) to a real host (e.g. Windows server + IIS + URL Rewrite)
  4. Redirect 301 all old URLs to new URLs on joomla.yourdomain.com. In the case of you use IIS and URL Rewrite module, here is an example:
<?xml version="1.0" encoding="UTF-8"?>
<configuration>
    <system.webServer>
        <rewrite>
            <rules>
                <rule name="Redirect to new URL" stopProcessing="true">
                    <match url="^oldURL$" />
                    <conditions>
                        <add input="{HTTP_HOST}" pattern="^blogger\yourdomain\.com$" />
                    </conditions>
                    <action type="Redirect" url="http:/joomla.yourdomain.com/newURL" />
                </rule>
            </rules>
        </rewrite>
    </system.webServer>
</configuration>

5. Use this tool to check old URLs, make sure that them are redirected 301 correctly.
6. Keep these re-directions at least 2 weeks for Google transfering its rankings to new URLs
7. Check Google search and turn off your old blog if you see OK.

Thanks for reading! Your comments and questions, and shares are welcomed and appreciated! Do you have a blog?

Monday, January 16, 2012

Lovely blogger sites

http://www.rindastemplates.com/
http://www.dhetemplate.com/2011/10/soul-spa-in-poland-blogger-template.html

Monday, January 9, 2012

How to Create a Static Homepage in Blogger

Here are some basic instructions that will allow you to create the appearance of a static homepage using Blogger as your blogging platform. To make Blogger have a static homepage you first need to create an HTML/Javascript Gadget (formally called widgets).

Update: You cannot completely create a static homepage using Blogger. You are creating the appearance of a static homepage. If you truly want a static homepage either create a website or use WordPress. You can also purchase the template I use for this site from Magznetwork for $25 which will give you lifetime support and they have great tutorials on their site to help you.

Follow these simple steps to create a static homepage:

1. Log into your Blogger.com account.

2. Click the Layout link from the Dashboard.

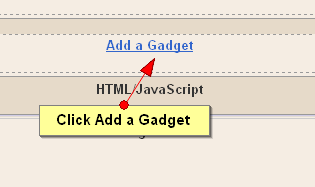
How to Create a Static Homepage in Blogger3. Click Add a Gadget from anywhere on the Page Elements screen.

How to Create a Static Homepage in Blogger4. Click the + symbol next to HTML/JavaScript gadget.

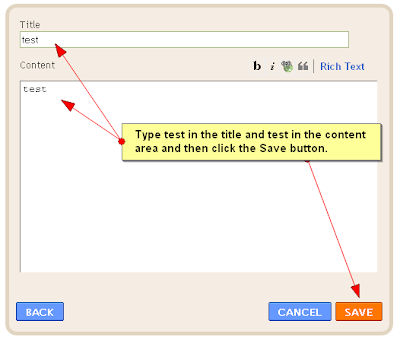
How to Create a Static Homepage in Blogger5. Type test in the Title for now and test in the body of the gadget and click Save. You will change the words test to whatever you want later. For now we will be using the word test to find the gadget easier in the HTML code.

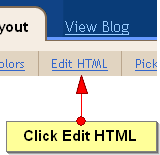
How to Create a Static Homepage in Blogger6. Next, click Edit HTML at the top of the page.

How to Create a Static Homepage in Blogger
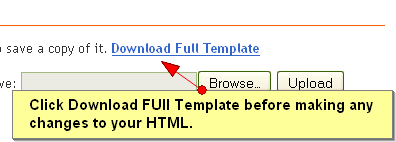
7. Click Download Full Template to make a backup of your existing template before making any changes to your HTML. You should do this each time you plan on tweaking the HTML code in case something goes wrong. Then you can easily upload your template before you made the changes and restore your blog if needed.
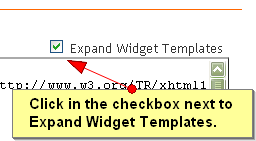
How to Create a Static Homepage in Blogger8. Click on the checkbox next to Expand Widget Templates.

How to Create a Static Homepage in Blogger9. Using your Find feature on the browser through the Edit menu or pressing CTRL + F on your keyboard at the same time, search for the word test.

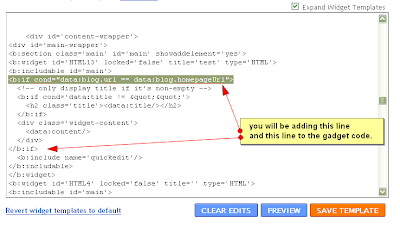
10. Click just AFTER <b:includable id="main"> and press the Enter key once. Then type or copy and paste this line of code
<b:if cond="data:blog.url == data:blog.homepageUrl">
11. Scroll down just slightly and look for <b:include name="quickedit"> and click in the blank space IN FRONT OF this line and type or copy/paste this code in.
</b:if>
When you are done your HTML code should look like this. You may want to click on this picture to make it larger so you can see it better.

How to Create a Static Homepage in Blogger12. Click Save Template at the bottom right.

13. Now click View Blog at the top of the page.

14. You should see the word test twice near the top and your posts just below that. Click on one of the posts. Now, if you have followed the steps correctly you should NOT see test on the post page.

15. Now you can go back to the Layout/Page Elements area and change the word test in the title and the test in the content area to whatever you want to appear on your homepage. You can also remove the word test from the title if you don't want a heading to show.

Summary

What we have done is to create a gadget and by just adding 2 lines of HTML code you have made it static - meaning it will only appear on the homepage and not on the post pages.

The best way to use a static homepage gadget is to set your posts to show one each page. You will then show the static gadget on the homepage and then one post just below it. To set your Blogger blog to only show one post per page click on the Settings tab at the top of the page and then click the Formatting link. You will see the box where you specify how many posts show on each page.

Here are some examples of what you can do with a static homepage:
  • Create a welcome paragraph that introduces your blog
  • Create a Google Adsense ad that only shows on your homepage
  • Create a small gallery of pictures that you only want to show on your homepage
  • Create a list of popular posts and link to those posts
Most of my Blogger blogs feature a static homepage. If you take a lot at my sites you will see what I mean. However, I have also chosen a template that had the static homepage featured already embedded in the code so I didn't have to use this function that I am teaching you.

If your template does not already have the static homepage feature then you can easily follow these steps to make your Blogger appear to have a static homepage.

Adding a lading page or a welcome page for blogger

Have a look at this demo,
http://bswidgetshowcase.blogspot.com/

if that's what you want, here is the tutorial:
http://bloggersentral.blogspot.com/2010/01/adding-entry-or-welcome-page.html

Here is a tutorial for creating an entry or welcome “page” for your blog. I think it can also be called a splash page or a landing page, hmm….whatever.
It is different from the usual welcome message found in most Blogger blogs whereby the message is placed on top of the blog post column, and stays up there the entire time.
This welcome page acts like an entry page. It only appears at the beginning of  a visit and disappears when the visitor “enters” the blog. Definitely better than an alert box, looks nicer and comes without the annoying sound.
The page comes with these features:

  1. Lightbox-type message window.
  2. This entry page is fully widgetized, so it can be removed by simply removing the two gadgets, no need to deal with your template HTML.
  3. Visitor need to click ENTER button to continue viewing your blog. This in a way, will make sure your visitor to read your important welcome message before entering your blog.
  4. Only external visitors will go through the welcome page. Readers coming from any one of your blog pages will bypass this page.
See the entry page in action here in my widget showcase blog.


Adding HTML/Javascript and text gadgets

We won’t add the widgets in Page Elements. We will add it  by adding a code to your template HTML.  This way we can give the widget our own Id. We will add two widgets, one is a Text gadget to hold the welcome message, the other one is a HTML/Javascript gadget to hold the codes that will transform the Text gadget into a welcome page.
Now let’s do this:
  1. Login to your to your Blogger account.
  2. Back up your template.
  3. At Dashboard go to Design > Edit HTML.
  4. Make sure the Expand Widget Templates check box on top right of the HTML window is unticked.
  5. Find this code in your template HTML:
    • <body> -if you are using Layout templates, or
    • <body expr:class='&quot;loading&quot; + data:blog.mobileClass'> -if you are using Template Designer’s template.
  6. Copy the code below and paste it immediately after the code in step 5:
    1<!-- Welcome page Start -->
    2<div id='welcome-wrapper'>
    3<b:section class='welcome' id='welcome' showaddelement='no'>
    4<b:widget id='Text88' locked='false' title='' type='Text'/>
    5<b:widget id='HTML88' locked='false' title='' type='HTML'/>
    6</b:section>
    7</div>
    8<!-- Welcome page End -->

Adding contents to the gadgets

  1. Go to Design > Page Elements. You should see the newly added widgets above the header. welcome or entry page element
  2. Click Edit on the Text gadget and enter your welcome message or greeting. Remember this entry page adds an extra step before your readers could reach your blog content. So make it short and worth their wile reading it.
  3. Then proceed with the HTML/Javascript gadget  (HTML88). Add the code below in the content box:
    01<!-- Welcome page Start (c) 2010 Blogger Sentral. Original code by http://www.bloggersentral.com/. Please do not remove this credit and the “Get this widget” link at the bottom of the widget. -->
    02<!-- HTML part -->
    03<div style="padding-top:15px;">
    04<a id="EPEntryButton" onclick="document.getElementById(&quot;HTML88&quot;).style.display=&quot;none&quot;;document.getElementById(&quot;Text88&quot;).style.display=&quot;none&quot;">ENTER</a>
    05</div>
    06<div id="EPGrab"><a href="http://www.bloggersentral.com/2010/01/adding-entry-or-welcome-page.html" target="_blank">Get this widget</a></div>
    07<div id="EPDarkLayer"></div>
    08<!-- CSS part -->
    09<style>
    10#welcome-wrapper{width:40%;margin:0 auto;height:0px;text-align:center;}
    11/* welcome message widget */
    12#Text88, #EPEntryButton, #EPGrab {position:relative;z-index:510;top:100px;}
    13#Text88 {background-color:#fff;border:solid 10px orange;color:#222;display:none;padding:15px;}
    14#HTML88 {z-index:499;display:none;}
    15/* DarkLayer div */
    16#EPDarkLayer {background-color:#000;opacity:0.6;filter:alpha(opacity=60);top:0px;left:0px;/*bs-aewp*/z-index:500;position:fixed;}
    17/* Entry button */
    18#EPEntryButton {background-color:lawngreen;border:solid 2px #fff;color:#333;cursor:pointer;font-size:25px;padding:5px;text-decoration:none;}
    19#EPGrab {color:white;padding-top:10px;}
    20</style>
    21<!--[if IE 6]>
    22<style>
    23#EPDarkLayer {position:absolute;}
    24</style>
    25<![endif]-->
    26<!-- Javascript part -->
    27<script type="text/javascript">
    28YourBlogUrl="http://bloggersentral.blogspot.com/"; //enter your blog url here
    29fromInternal=document.referrer.search(YourBlogUrl); //check come from where
    30getDarkLayer=document.getElementById("EPDarkLayer").style;
    31getText88=document.getElementById("Text88").style;
    32getHTML88=document.getElementById("HTML88").style;
    33if (fromInternal == -1)
    34{ //if visitor comes from external page
    35getDarkLayer.width=screen.availWidth+"px"; //set DarkLayer width
    36getDarkLayer.height=screen.availHeight*2+"px"; //set DarkLayer height
    37getHTML88.display="block"; //show DarkLayer
    38getText88.display="block"; //show message
    39}
    40else
    41{ //if visitor comes from internal page
    42getHTML88.display="none"; //hide HTML gadget
    43getText88.display="none"; //hide message
    44}
    45</script>
    46<!-- Welcome page End -->

Configuring the welcome page

Reminder: When editing code in a HTML/Javascript gadget, never click the Rich Text link. Doing so will add forced line breaks <br/> in your code, thus ruining it.
  1. YourBlogUrl –this is your blog url, replace http://bloggersentral.blogspot.com/ (in code line 28) with your own blog url.
  2. Below are some CSS properties you can change to suit your preferences.
    • Message window width can be changed in code line 10.
    • The message window can be adjusted vertically by changing top value in code line 12.
    • To adjust the background transparency or color, go to code line 16. For transparency you need to change both values -opacity (scale from 0 to 1), filter:alpha(opacity) (scale from 0 to 100).
Enjoy!

How To Add A Google Docs Contact Form To Blogger


Making The Form

To begin, log in to Google Docs, and create a new form as shown by the image below. You can punch in a title for your form to keep yourself organized, but you could actually leave this section of your form as “Untitled” and it wouldn’t make any difference. In order to make it a legitimate contact page, you should provide users with the “paragraph text” question type. This allows enough room for lengthy questions or comments.
google docs blog
google docs blogger
Please take note that the default form automatically inserts two sample questions. Make sure to delete the second sample, or else you will have a phantom inquiry that you don’t really need. However, if you want to add more questions using different answer formats (checkboxes, multiple choice, etc.) then you are free to do so. You can even make the answers required for items such as contact details. After you are done, make sure you remember to save it.

google docs blogger

Ripping The Form

You may already be aware that Google forms tend to stick to non-customizable templates that often don’t mesh well with your blog’s design. Sure, you can embed the form using an iFrame code, but it still retains the same format as the pre-designed cookie-cutter templates. Thankfully, there is a way around that.
After completing your form, go back to your Docs homepage and open up the spreadsheet of the form you have just created. As a side-note, this spreadsheet will allow you to see all the submissions to your form. When you arrive on this page, select “Form” on the menu bar and then click “Go to live form“.
google docs blogger

While looking at your form page, you should use whatever feature your browser allows for looking at the page source code. Since I am using Chrome on my Mac for this tutorial, I merely used my trackpad to open the contextual menu and selected “View Page Source“.

google docs on blogger
Right here, things might get tedious, so pay close attention. You should use the Find function of your browser (CTRL + F) to locate the term “form action“. When you find it, you should see this code:
<div class="ss-form><form action="YOUR_FORM_URL" method="POST" id="ss-form">
Make a note of where this line of code is, and then find this next bit of code:
</script></div>
Copy all the way down from the first mentioned line of code to the next mentioned line of code. If you would feel more comfortable pasting this code in a text app, then go ahead. You will be using it momentarily.

Installing The Form

After you have successfully copied your selected code to your clipboard, you should go into your Blogger dashboard. As I said before, I am using the Blogger in Draft interface, but if you are using the original UI, you will still be able to follow along.
First off, you should create a new page for your blog and entitle it “Contact Me” or something similar. After opening it, go directly to the HTML editing section of the page and paste the code.
google docs on blogger
As of now, you have basically completed the task of installing the form on your blog. At this point, your preview should look similar to the image below. However, previews are going to be different for different people based on the machine they are using.

Customizing The Form

As I discovered with my personal blog, sometimes there will be problems such as there being too much space between the page title and the form itself or the answer box being too big for the width of the blog. These minor problems can be easily fixed.
If you are having issues with there being too much space between the title and the questions, search for any
br
tags and delete them. However, if you are having issues with the width of the answer box, search for this line of code:
<textarea name="entry.0.single" rows="8" cols="75" class="ss-q-long" id="entry_0">
By adjusting the “cols” value to a lesser number, you can change the width of the blog to suit smaller screens or alternate browsers. Furthermore, you can actually change the fonts of the questions while editing the page. With enough customization, you can end up with something like the following image.
google docs blog

Conclusion

This is a quick and efficient way to place a style-matching Google Docs form on your Blogger blog, and the tutorial could likely be adapted for any other blog or website. You can do a lot more than what you see here, so make sure you play around with it for a little while.
What other sites do you use to make web forms? How did this tutorial work out for you?  If you have any problems making your own web form, let us know in the comments or alternatively ask a question over at MakeUseOf Answers.                            

Link Google Docs To Blogger


Using iframe, e.g.:
<iframe height="150" frameborder="0" width="250" src="https://docs.google.com/spreadsheet/pub? hl=en_US&amp;hl=en_US&amp;key=0As3QebDAu9_ adDBka2dXaHhKM1dSVUhFX1ZhLUZLN 2c&amp;single=true&amp;gid=1&amp;output=html&amp;widget=true"/>

Learn to Design Blogger Template

http://btemplates.com
http://www.betatemplates.com
http://www.ourblogtemplates.com
http://begin-tips.blogspot.com/2011/08/10-templates-blogger-used-photo-gallery.html


How do I remove the Powered by Blogger from my Blogger blog?

In order to remove you will need to edit the blogger template and delete the attribution widget in the new Blogger interface.

If you are using the old interface, please read this post on removing Powered by Blogger in old Blogger interface.


Please backup your blogger template before you make any changes to it. This helps to revert back to the original template when something goes wrong while editing your template. The steps for backup and restore are discussed here in detail.

Steps to remove the Powered by Blogger text from your blog in the new Blogger interface:
1. Click on the Template link in the left navigation menu.


2. Click on the Edit HTML button

.
3.Select the Expand Widget Templates check-box

4. Remove the following highlighted code.

5. Click on Save Template Button.
6. A warning is displayed.Click on Delete Widgets and click on Save Template Button.

Blogger Template Design: Introduction


Blogger Template Design: Introduction

This tutorial is a very quick guide to teach you how to change or design your own Blogger templates. It's easy to understand and follow, especially to those who has no knowledge in HTML programming.

The tutorial is split into a number of sub-tutorial modules that explain specific parts of Blogger template design in detail. The best way to learn is by going through the module sequence one by one. But if you are familiar with the basics, you can jump into the more advanced modules. The earlier modules are focused on explaining the basic structure of the template design and the template code so that you understand more about a Blogger template in general. The later modules explain each section of a Blogger template in more detail and help you go through the process of coding and designing a template in a step-by-step approach.

In the tutorial, some of the names and terms are based on my own template design, but I'll explain them as general as possible so you get the bigger picture and can adapt to different template designs.

Tutorial Contents
Subscribe to RSS Feed Follow me on Twitter!