Showing posts with label ms sql. Show all posts

Thursday, September 6, 2018

MS SQL Server: How to copy a standby DB (logs shipped) to another instance

Why we need to copy a standby database? The main reasons are the location & time. Normally the online DB will be in a server on datacenter/clouding, while the standby DB (logs shipped) will be in a local server. So if you have a big size DB, you may take time & traffic to transfer the backup of online DB to a local server for doing your needs. However, if you can copy the standby DB, it will be faster and save your traffic. After copying, your standby DB can still receive logs shipped from the online DB.

Below are steps to do this on the standby server.

1. Take offline the standby DB
Run the following command:

USE MASTER
GO
ALTER DATABASE [DBNAME] SET OFFLINE

2. Disable restoring job
On MS SQL Server Management Studio, go to SQL Server Agent >> Jobs >> right click on the restoring job >> select Disable, see the following for example:


3. Copy data file (.mdf) and log file (.ldf) of the standby DB to another place
To know where, you can right click on DB >> select Properties >>  select tab Files >> see Path column.

4. Take online the standby DB
Now, we take it back for continuing receiving logs shipped. Run the following command:

USE MASTER
GO
ALTER DATABASE [DBNAME] SET ONLINE
5. Enable restoring job again

After this step, you standby DB will run normally again.

Now we can create new DB and copy files in step 3 above to. Below are steps on the server which will run this copied DB.

6. Create new DB (same name with standby DB)
Run the following command (make sure new DB same names DBNAME_Data and DBNAME_Log with standby DB):

CREATE DATABASE [DBNAME]
ON
(NAME = 'DBNAME_Data', FILENAME = 'C:\SQL-Data-Folder\DBNAME.mdf')
LOG ON
(NAME = 'DBNAME_Log', FILENAME = 'C:\SQL-Data-Folder\DBNAME.ldf')

7. Take this new DB offline

ALTER DATABASE [DBNAME] SET OFFLINE

8. Copy files in step 3 overwrite files of new DB created

9. Grant permission for MSSQLSERVER working on copied files
On file explorer, right click on the file name >> select Properties menu >> select tab Security >> click Advanced button:


Change the owner and add full permissions on these files copied for user running SQL service (normally it is NT Service\MSSQLSERVER). See red boxes on above picture for example.

10. Take this new DB online

ALTER DATABASE [DBNAME] SET ONLINE

OK, now you have a copied DB of standby DB running. Have fun.

Wednesday, July 25, 2018

MS SQL: How to configure log shipping with FreeFileSync over FTP/SFTP

In MS SQL, log shipping is a popular technique for:
  • Copy and sync a database to multiple servers
  • High availability / failover / disaster recovery / backup plan
  • Data warehouse / reporting server
Comparing with mirroring technique, although log shipping has late time (10-15 minutes) bigger than mirroring (few seconds) but we can use the secondary database(s) of log shipping for reading while we can not do anything with mirrored database (only one mirrored database). So depending on how your system wants, you can use both of these techniques or one of them.

Normally, log shipping is configured natively with a shared folder which the secondary server can access via  private / public network. You can configure the shared folder to limit for some users or some IP addresses (by firewall). However, the disadvantages of shared folder are security issues when sharing over Internet and we cannot control bandwidth when transferring file data.

In this article, I want to introduce you another way to do the log shipping via FTP/SFTP by using
by using FreeFileSync which can solve above disadvantages.

1. Prepare environment

On the secondary server:
  • Setup FTP server (can use FileZilla Server) on the secondary server. Then configuring a FTP folder for receiving transaction log files from the primary server. For example, the FTP folder is configured with a local folder C:\FTP\FileSync.
  • Create a folder (e.g. C:\Translog) for copying log files synced from C:\FTP\FileSync to.
  • Grant full permission for user running SQL Server Agent service (normally it is NT Service\SQLSERVERAGENT, let check in Services tool) and user running SQL Server service (normally it is NT Service\MSSQLSERVER) to control the folder C:\Translog.
  • Open C:\Windows\System32\drivers\etc\host with Administrator right then add a line with IP to point the primary server name, for example: 192.168.72.100 PRIMARY_SERVER_NAME (to know the host name, open CMD on the primary server then run command hostname).
On the primary server:
  • Create a folder save log files exported (e.g. Z:\Translog). Grant full permission for user running SQL Server Agent service and user running SQL Server service to control the folder Z:\Translog.
  • Open C:\Windows\System32\drivers\etc\host with Administrator right then add a line with IP to point the secondary server name, for example: 192.168.72.101 SECONDARY_SERVER_NAME
  • Download FreeFileSync and install it on the primary sever.
  • Create a batch job on FreeFileSync for syncing files (Mirror way) from Z:\Translog to the FTP folder on secondary primary. See the tutorial video on https://freefilesync.org/tutorials.php and the following pictures for how to.
  • Setup RealTimeSync for the batch job for watching on Z:\Translog and syncing files real time. See the tutorial video on https://freefilesync.org/tutorials.php and the following pictures for how to.


2. Setup log shipping on the primary server by using MS SQL Management Studio

Make sure your DB is Full recovery model (or Bulk-logged). Right click on your DB >> select Properties menu and check & change in Options section:


Move to Transaction Log Shipping section and tick Enable this as a primary database...:


Then click Backup Settings button to pop up below form:


In the box Network path to backup folder..., let key \\YOURSERVER\SF or any kind of shared folder you want. That is a fake folder which we won't use, just key in for enabling OK button. The second box, let key in the folder Z:\Translog which you prepared. You can change the other parameters according your need. I recommend to use Compress backup option for saving bandwidth when transferring logs via Internet. Click OK button to finish this form.

In Monitor server instance area, tick Use a monitor server instance then click Settings button to bring up the following form:


Click Connect button then connect to the secondary server, you can change the value of Delete history after and click OK button to finish.

Back to Transaction Log Shipping section, click OK button to establish configurations for the primary server. It will enable the primary database for log shipping and create 2 jobs: LSBackup_XXX in SQL Server Agent >> Jobs of the primary server and LSAlert_XXX in SQL Server Agent >> Jobs of the secondary server.

Right click your DB, select menu Task >> Back Up... select Backup type as Full. Then backup your DB to disk. This backup file will be copied to the secondary server for initializing secondary database.

Before going to the secondary server and configuring, we will do a trick to get a script for running on that server. Open back Transaction Log Shipping section, on Secondary databases click Add button to open below form:


Click Connect button and connect to the Secondary server instance and Secondary database (e.g. TestDB). Select option "No, the secondary database is initialized" then move to Copy Files tab:


Key in the folder in the secondary server for copying transaction log files (e.g. C:\Translog_Copy). Move to Restore Transaction Log tab:


Select Standby mode and tick "Disconnect user..." to put the secondary database into read only mode and disconnect users when restoring. Then click OK button.
Back to Transaction Log Shipping section, in the bottom click Script Configuration >> Script Configuration to New Query Window, ah ha let see the script generated. Before viewing this script, let click Cancel button to close Transaction Log Shipping without doing any thing.


Go to the query window opened and copy the script between "Begin: Script to be run at Secondary" and "End: Script to be run at Secondary" to run on the secondary server later.

3. Setup log shipping on the secondary server

First of all, let restore the full backup of primary database on the secondary server by using RESTORE WITH STANDBY (you should restore before generating the script on the step above):


After restoring, you will see the DB with text (Standby / Read-Only). Open new query windows and paste copied script above into here (remember to choose msdb for running the script later):


Yes, nearly done! We just modify the script a little bit to change the fake shared folder (\\YOURSERVER\FORDER) to the local folder (C:\Translog) on the secondary server which is the FTP folder to receive log files transferred from the primary server, see below for your idea:


That's it. Run the script. It will create 2 scheduled jobs: LSCopy_XXX (for copying file from C:\Translog to C:\Translog_Copy per 15 minutes) and LSRestore_XXX (for restoring transaction logs in C:\Translog_Copy to the secondary database per 15 minutes) in SQL Server Agent >> Jobs. You can go there to change the schedule of 2 these jobs.

Voila! You got the secondary database synced with primary database with interval 15-30 minutes (depending the time between LSCopy_XXX and LSRestore_XXX).

That's all. Any comment is welcome.

Sunday, October 15, 2017

MS SQL SMS export large data to Excel without breaking format

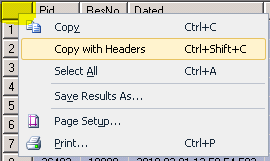
If you often work on MS SQL, surely sometimes you want to export large data (result a query) to Excel file. After querying on MS SQL SMS (Microsoft SQL Server Management Studio), you can use right click on the cell top left then select "Copy with Headers" and copy to Excel file or "Save Result As" and save to a CSV file.


However 2 these functions have their problems. "Copy with Headers" cannot copy large data.  "Save Result As" often breaks CSV format if your data contains some special characters.

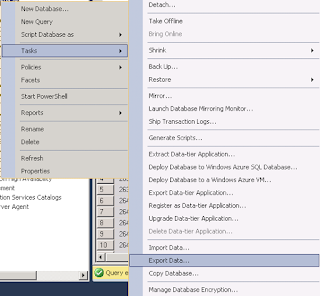
Fortunately, there is another function for exporting large data without breaking its format. Right click on your database and choose Tasks >> Export Data...


For Data Source, choose SQL Server Native >> select Server name >> select your Database, see the following for example:


Next, select Destination as Microsoft Excel & specify Excel file path.


Next, select Write a query to specify the data to transfer.


In next step, paste your query into or select a file containing your query. In the step Review Data Type Mapping, let review again columns have been converted data (Source Type vs. Destination Type). If you want to fix, click Back to select again Destination Type for converting.

If they are ok, click Next then Finish (don't worry for warning signs). Waiting a moment and you will have your Excel file with correct format you wanted.

Yeah! This is a small tip for you, hope it is useful. Share it to your friend for helping him or her out 😍. Any comment is welcome!

Happy Halloween!

Monday, August 22, 2016

MS SQL: using BCP + Powershell + Bulk Copy to sync your table to another server

The usage scenario is: you have a huge log table (or some tables like that) and you want to sync it from your production server to another server (slaver server) for analyzing daily. This will help to reduce workload of production server in analyzing as also as backup your data on slaver server. You even can delete old data (not used more) on your production server to minimize the size of production data.

Below steps to setup this sync job:

1. Use BCP to export & import data
On production server, run bcp command to export data, for example:
#bcp "SELECT * FROM log_table" queryout "C:\log_table.bcp" -N -S "PRODUCTION_SERVER_NAME" -d "DB_NAME" -U "USER_NAME" -P "PASSWORD"

After that, upload this log_table.bcp file to your slaver server, create a log_table having same structure as on production server, then run a command like example below to import data to your log_table:
#bcp "log_table" IN "E:\log_table.bcp" -N -S "SERVER_NAME" -d "DB_NAME" -U "USER_NAME" -P "PASSWORD"

2. Make Powershell script to bulk copy new data from production server to slaver server
Below is my sample script:

#Set-ExecutionPolicy Unrestricted
#2 params needed to provide for the script
Param (
[parameter(Mandatory = $true)]
[string] $LogTable,
[parameter(Mandatory = $true)]
[int] $Syncrows
)


$SrcServer = "PRODUCTION_SERVER"
$SrcDatabase = "PRODUCTION_DB"
$SrcUser = "USER_NAME"
$SrcPwd = "PASSWORD"
$SrcTable = $LogTable


$DestServer = "SLAVER_SERVER"
$DestDatabase = "SLAVER_DB"
$DestUser = "USER_NAME"
$DestPwd = "PASSWORD"
$DestTable = $LogTable


#create connection string
Function ConnectionString ([string] $ServerName, [string] $DbName, [string] $User, [string] $Pwd)
{
    "Server=$ServerName;uid=$User;pwd=$Pwd;Database=$DbName;Integrated Security=False;"
}


# executes a query and populates the $datatable with the data
function ExecuteSqlQuery ($ConnectionString, $SQLQuery) {
    $Connection = New-Object System.Data.SQLClient.SQLConnection
    $Connection.ConnectionString = $ConnectionString
    $Connection.Open()
    $Command = New-Object System.Data.SQLClient.SQLCommand
    $Command.Connection = $Connection
    $Command.CommandText = $SQLQuery
    $Reader = $Command.ExecuteReader()
    $Datatable = New-Object System.Data.DataTable
    $Datatable.Load($Reader)
    $Connection.Close()
    $Connection.Dispose()
    return ,$Datatable #work arround to get right datatable after unrolling arrays/collections
}


#get max id of last synced rows
$DestConnStr = ConnectionString $DestServer $DestDatabase $DestUser $DestPwd
$Query = "SELECT MAX(Pid) FROM " + $DestTable
$resultsDataTable = ExecuteSqlQuery $DestConnStr $Query
$LastRow = $resultsDataTable.Rows[0][0]


#bulk copy
$SrcConnStr = ConnectionString $SrcServer $SrcDatabase $SrcUser $SrcPwd
$SrcConn  = New-Object System.Data.SqlClient.SQLConnection($SrcConnStr)
if($Syncrows -eq 0) {
    $CmdText = "SELECT * FROM $SrcTable WHERE row_id>$LastRow"
}
else {
    $CmdText = "SELECT TOP ($Syncrows) * FROM $SrcTable WHERE row_id>$LastRow"
}
#Write-Host "$CmdText"
$SqlCommand = New-Object system.Data.SqlClient.SqlCommand($CmdText, $SrcConn)
$SrcConn.Open()
[System.Data.SqlClient.SqlDataReader] $SqlReader = $SqlCommand.ExecuteReader()
Try
{
   $logmsg = "$LogTable : Bulk copy completed!"
   $bulkCopy = New-Object Data.SqlClient.SqlBulkCopy($DestConnStr, [System.Data.SqlClient.SqlBulkCopyOptions]::KeepIdentity)
   $bulkCopy.DestinationTableName = $DestTable
   $bulkCopy.BatchSize = 100 #rows
   $bulkCopy.BulkCopyTimeout = 1800 #seconds
   $bulkCopy.WriteToServer($SqlReader)
}
Catch [System.Exception]
{
   $ex = $_.Exception
   $logmsg = $ex.Message
}
Finally
{
   $currenttime = Get-Date -format s
   Add-Content D:\logstatus.txt "`n$currenttime $logmsg"
   $SqlReader.Close()
   $SrcConn.Close()
   $SrcConn.Dispose()
   $bulkCopy.Close()
}


The above script will use BulkCopy to copy rows having id > id synced. You can limit number of rows for syncing via $Syncrows param. If $Syncrows=0, it will get all new rows to copy.

3. Create task schedule for copying new data
Use Task Scheduler to create a new task for running the script file, you can select your schedule as your demand. Remember to add below line in Action setting for passing Execution Policy:

-ExecutionPolicy Bypass D:\synctbl.ps1 -LogTable log_table -Syncrows 10000


That's all. Happy coding! Any questions?


Friday, June 10, 2016

SQL Server Management Studio: check size of tables

In MS SQL, checking / monitoring size of tables is important to manage spaces and optimize SQL performance.

You can use a SQL script in this article, but also some easier ways in SQL Server Management Studio (SSMS). You can do as one of the following way:

1. Right click on the database, select Reports > Standard Reports > Disk Usage By Table


2. Or press F7 to  view Object Explorer Details, navigate to Tables view, then right click on the header and select Data Space Usage column:

You can sort on the column.

Happy working!

Friday, November 27, 2015

MS SQL 2014 Mirroring and Trouble Shooting

Below are steps to configure mirroring for a MS SQL Database, and how to use mirroring database in an effective way:

1. Use SQL Management Studio to check if database is in Full Recovery model. If not, let configure it as Full Recovery.

2. Issue a full backup of the database, for example:
BACKUP DATABASE [DBNAME] TO DISK = 'E:\DBNAME.bak';

3. Issue a transaction log backup of the database, for example:
BACKUP LOG [DBNAME] TO DISK = 'E:\DBNAME.trn';

4.  Restore the full backup to the Mirror server with the NORECOVERY option. You can use SQL Management Studio to do this, or use a command as below:
RESTORE DATABASE [DBNAME] FROM DISK = 'Z:\DBNAME.bak' WITH NORECOVERY

In the case you want to move files on Mirror server to other folder path differing with folder path on Principal server, you should do as the following:
RESTORE DATABASE [DBNAME] FROM DISK = 'Z:\DBNAME.bak' WITH NORECOVERY,
MOVE 'Logical_Data' TO 'C:\NewPath\DBNAME.mdf',
MOVE 'Logical_Log' TO 'C:\NewPath\DBNAME_log.ldf'

You can know Logical_Data and Logical_Log of the database on Principal server by run a command in step 18.

5. In Mirror server, restore log backup also with the NORECOVERY option, for example:
RESTORE LOG [DBNAME] FROM DISK = 'Z:\DBNAME.trn' WITH FILE=1, NORECOVERY

If you have any auto backup log in Principal server, you should turn off it. Otherwise having any additional log backups before you start mirroring, you must also restore all of those log backups, in sequence (FILE=2, FILE=3 etc.), to the mirror server using WITH NORECOVERY.

6. Configure IPs and host name between 2 servers. On each server open file:
C:\Windows\System32\drivers\etc\host with Administrator right then add a line with IP to point the partner host name, for example:
192.168.72.100 PARTNER_HOST_NAME
To know the host name, open CMD then run command hostname, for example:
C:\Users\Administrator>hostname

7. Configure firewall (inbound port) of each server to allow the port  used for this mirroring (e.g. 5022)
Can use PsPing for checking port.

8. Configure to allow principal server access SQL on mirroring server. For example, you open port 1433 for principal server.

9. If server instances (mirroring instance & principal instance) are running under different domain user accounts, you should create a same login user for running these instances. This login user can be a Windows user.
In the case both servers are not running on same domain and your servers' names are not in FQDN, you can skip this step and just do the following steps (10, 11, 12, 13).

10. Create a certificate and an endpoint on Principal server:
USE master
GO
CREATE MASTER KEY ENCRYPTION BY PASSWORD = 'your_password'
GO
CREATE CERTIFICATE Principal_cert
WITH SUBJECT = 'Principal certificate',
START_DATE = '01/01/2015',
EXPIRY_DATE = '01/01/2050'
GO
CREATE ENDPOINT Mirroring
STATE = STARTED
AS TCP (LISTENER_PORT = 5022, LISTENER_IP = ALL)
FOR DATABASE_MIRRORING
(
AUTHENTICATION = CERTIFICATE Principal_cert,
ENCRYPTION = REQUIRED ALGORITHM AES,
ROLE = ALL
)
GO
BACKUP CERTIFICATE Principal_cert
TO FILE = 'Z:\Principal_cert.cer'
GO


11.
Create a certificate and an endpoint on Mirror server:
USE master
GO
CREATE MASTER KEY ENCRYPTION BY PASSWORD = 'your_passport'
GO
CREATE CERTIFICATE Mirroring_cert
WITH SUBJECT = 'Mirroring certificate',
START_DATE = '01/01/2015',

EXPIRY_DATE = '01/01/2050'
GO
CREATE ENDPOINT Mirroring
STATE = STARTED
AS TCP (LISTENER_PORT = 5022, LISTENER_IP = ALL)
FOR DATABASE_MIRRORING
(
AUTHENTICATION = CERTIFICATE Mirroring_cert,
ENCRYPTION = REQUIRED ALGORITHM AES,
ROLE = ALL
)
GO
BACKUP CERTIFICATE Mirroring_cert
TO FILE = 'Z:\Mirroring_cert.cer';
GO


12. Create a user login for the endpoint on Principal server:
USE master
GO

CREATE LOGIN Mirroring_login WITH PASSWORD = 'your_password'
GO

CREATE USER Mirroring_user FOR LOGIN Mirroring_login
GO

CREATE CERTIFICATE Mirroring_cert
AUTHORIZATION Mirroring_user
FROM FILE = 'Z:\Mirroring_cert.cer'
GO

GRANT CONNECT ON ENDPOINT::Mirroring TO [Mirroring_login]
GO


13. Create a user login for the endpoint on Mirror server:
USE master
GO
CREATE LOGIN Principal_login WITH PASSWORD = 'your_password'
GO
CREATE USER Principal_user FOR LOGIN Principal_login
GO
CREATE CERTIFICATE Principal_cert
AUTHORIZATION Principal_user
FROM FILE = 'Z:\Principal_cert.cer'
GO
GRANT CONNECT ON ENDPOINT::Mirroring TO [Principal_login]
GO


14. Use SQL Management Studio to set up Mirroring (partners) for your database on Principle server. Then start your mirroring.

For more quickly, you can user the following commands on the mirror then the principal:

USE MASTER
GO 
ALTER DATABASE [DBANME] SET PARTNER = 'TCP://PrincipalServer:5022' 
GO

USE MASTER
GO 
ALTER DATABASE [DBNAME] SET PARTNER = 'TCP://MirrorServer:5022' 
GO 

If you see the status "Synchronized", that means everything goes well. If not, the status may be "Suspended". In that status, you need to clean on mirrored server for getting more space then click Resume button here to start the mirroring again.

15. In case of you removed the mirroring for maintaining / cleaning DB on principal, after removing mirorring you can do step 2, 3, 4, 5 to update new DB to the mirror server. Then you can start the mirroring again by one of the following ways:

15.1 Start the mirroring session again by running below commands:
First on the mirror:
ALTER DATABASE [DBNAME] SET PARTNER OFF
ALTER DATABASE [DBNAME] SET PARTNER = N'TCP://PrincipalServer:5022'

Then on the principal:
ALTER DATABASE [DBNAME] SET PARTNER = N'TCP://MirrorServer:5022'

15.2 Recreate ENDPOINT for the mirroring, let drop it on Principal server and create again.
DROP ENDPOINT Mirroring

CREATE ENDPOINT Mirroring
STATE = STARTED
AS TCP (LISTENER_PORT = 5022, LISTENER_IP = ALL)
FOR DATABASE_MIRRORING
(
AUTHENTICATION = CERTIFICATE Principal_cert,
ENCRYPTION = REQUIRED ALGORITHM AES,
ROLE = ALL
)

GRANT CONNECT ON ENDPOINT::Mirroring TO [Mirroring_login]

On Mirror server, we can do nothing.

To check existing certificates, run:
SELECT * FROM sys.certificates

15.3 If you want to redo all, let drop all on each server then do above steps again.

USE master
DROP ENDPOINT
Mirroring
DROP CERTIFICATE Principal_cert
DROP CERTIFICATE Mirroring_cert
DROP LOGIN [login]
DROP USER [user]
DROP MASTER KEY 
GO

16. To check whether a server instance has a database mirroring endpoint and to learn its role and state, on that instance, use the following Transact-SQL statement:
SELECT * FROM sys.database_mirroring_endpoints
or
SELECT role_desc, state_desc FROM sys.database_mirroring_endpoints

or check state, stop and start:
SELECT * FROM sys.endpoints
ALTER ENDPOINT endpoint_name
STATE = STOPPED
ALTER ENDPOINT endpoint_name STATE = STARTED

17. To manually bring mirroring database online after principal database is down use below commands:
ALTER DATABASE [DBNAME] SET PARTNER OFF
RESTORE DATABASE [DBNAME] WITH RECOVERY

18. To use mirroring database any time (e.g. for your reports), let create snapshot of mirroring database then use it as an independent database.
Firstly, you need know the Logical Name of your mirroring database, run:

SELECT name AS LogicalName, type_desc, physical_name
FROM sys.master_files
WHERE DB_NAME(database_id) = 'DBNAME'

Then create the snapshot:

CREATE DATABASE [DBNAME_SNAPSHOT_NAME] ON --
(
NAME = 'LogicalName' , FILENAME = 'Z:\DBNAME_SNAPSHOT_NAME.ss' -- replace with the Logical Name above
)
AS SNAPSHOT OF [DBNAME]

19. Let create full log backup for principal database for every 15 minutes, if not the log of principal database will increase quickly. In the case of the disk is getting full and you want to shrink log file to free unused space, let restart principal server then run Shrink log file.

That's all. Bye! Any comments is welcome.

Subscribe to RSS Feed Follow me on Twitter!