Sunday, July 23, 2017

Playing with template in Joomla 3.x

Template is the heart of Joomla. Almost of things which you need for your website, just do them in your template. In the template, you can override other extensions (components & modules)  without touching to their source code. So you can easily update new versions of the extensions or Joomla without impacting to the front end of your website. This is very important because Joomla community often releases security fixes which you should update immediately for your website if any.

In this article, I will collect & introduce to you some tips which you can play with Joomla's template to setup your website beautifully, quickly and security.

1. Uninstall unnecessary templates

If you don't use a template, let remove it. Less code that means your website is more lightweight, faster and more security. Below the steps to install a template:
  • Go to menu Extensions >> Manage >> Manage
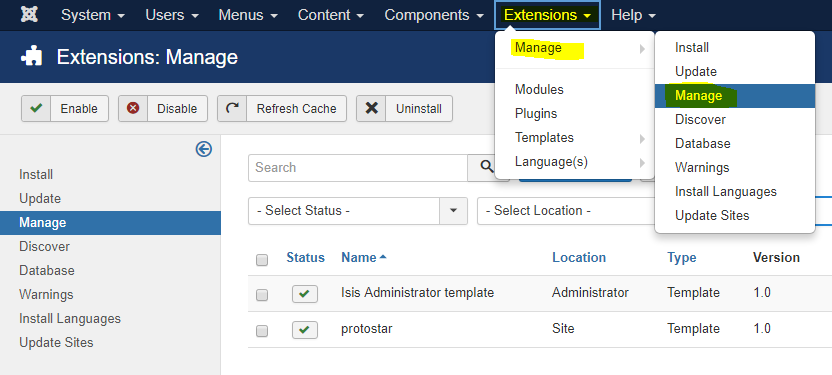
  • Click Search Tools button >> select type as Template >> click the check box of a template wanted to install >> click Uninstall button.

This will remove permanently all source code of the template from your site.

2. Edit source code of a template, code your website on mobile devices

Joomla 3.x provides an editor for editing source code of any template. It is very powerful. I think it is a strength of Joomla against the other CMS. With this editor, you can code your website when you are travelling on mobile devices like smart phone or tablet.
To open the editor for your template, go to Extensions >> Templates >> Templates >> click on the template name:
It will open a screen with files & folders of source code in left side. Here you can do many actions via buttons on the top. Click Documentation button if you want to learn more about this editor. To edit a file, click on its name:


Above are buttons I often use. The right side is source code of selected file. To change for editing the other file, just click on its name. Soo cool 👍

3. Compile LESS file

Another weapon of Joomla is it supports to compile LESS file directly on the template editor. You don't need to install any extra tool. To know what is LESS, let read: http://lesscss.org.

LESS files are often in less folder. If you open a LESS file on the editor, it will show Compile LESS button. After compiling, it will translate into a CSS file corresponding with LESS file in css folder. The template file uses CSS file to present its styles.


4. Create overrides for extensions

In manual way, you must copy the original PHP file from the source of extension into a proper place in your template directory. The correct directory structure for your override file is:
templates/TEMPLATE_NAME/html/EXTENSION_NAME/VIEW_NAME/FILE_NAME.php
You can read here for an example.

However in Joomla 3.x, you can also create overrides for extensions by clicking Create Overrides tab then click an extension (module, component, layout) which you want to override in the template manager.


5. Customize Protostar template

As a beginner of Joomla template coding, one of the fastest way is studying & customizing an existing template. What is good template for you starting? I recommend the Protostar template. It is one of the two front-end templates included with a Joomla 3.x source code. Protostar likes a blank responsive template, it is simple but displays well on many devices. So you can build your own template from this template with a basic knowledge about PHP, JavaScript & CSS.

In this section, I give an example on how to create a mobile menu which displays all submenus without touching on parent menu. By default, a submenu will be showed when hovering on parent menu. You can do this action on desktop with mouse, but cannot in a mobile with touching screen. It causes your submenu is never reached on the mobile.

By adding below code into template.less file (in @media query for mobile screen) and re-compile it in the template editor, you will have a proper menu on mobile:

@media (max-width: 480px) {
//start changes
    .navigation .nav-child {
        display: block;
        position: unset;
        float: unset;
        border: unset;
        box-shadow: unset;

        &:before {
            display: none;
        }
    }
    .navigation .nav > li > .nav-child {
        &:before {
            display: none;
        }
    }
//end changes
    .item-info > span {
        display:block;
    }
    .blog-item .pull-right.item-image {
        margin:0 0 18px 0;
    }
    .blog-item .pull-left.item-image {
        margin:0 0 18px 0;
        float:none;
    }
}

Here are screens for desktop and mobile:

It's time to go to bed. Bye everyone! Any comment is welcome.

Friday, July 14, 2017

Learn Selenium (a Test Automation Tool) with C# - Part 2

In this part, we will learn how to a test application to do login Facebook automatically.

For beginning, I want to introduce about XPath. It is a major element in the XSLT standard. XPath can be used to navigate through elements and attributes in an XML document. You can read more about it on here.

In Selenium we will use XPath to find element(s) then make action according to the scenarios for testing.

If you are familiar with FireFox, you can use Firebug and FirePath add-on. They are very popular and strong tools for FireFox web developer. You just need to install them, open a website which you want to test, open Firebug >> click FirePath tab >> click the pointer and select an element on the page for getting its XPath value. See the following picture for example:


If your are familiar with Chrome, you can use XPath-Helper extension. But I recommend you use a built-in function of Chrome DevTools. Just open the website, press F12 then press Ctrl + F to enable DOM searching box. Using pointer to point an element then key a XPath value in to searching box for finding matched elements. If the matching is only 1, it is the XPath for this element.


For searching, you can try the first search with syntax:  .//*[@attribute-name='value']
For example a element having id="email", you can try: .//*[@id='email']

Another way on Chrome is using Console panel of Chrome DevTools with the function $x("XPath value"). For example: $x(".//*[@id='email']")

OK, that's enough for XPath. It's time to code our test application. Yes, let see the code first and I will explain later:

using OpenQA.Selenium;
using OpenQA.Selenium.Chrome;

namespace SeleniumTutorial
{
    class Program
    {
        static void Main(string[] args)
        {
            IWebDriver wd = new ChromeDriver(@"E:\working\abc\SeleniumTutorial");
            wd.Url = "https://www.facebook.com/";
            wd.Manage().Window.Maximize();
            wd.FindElement(By.XPath(@".//*[@id='email']")).SendKeys("your_email@domain.com");
            wd.FindElement(By.XPath(@".//*[@id='pass']")).SendKeys("your_password");
            wd.FindElement(By.XPath(@"//input[@value='Đăng nhập']")).Click();

        }
    }
}


Comparing with Part 1, the blue codes are new. In which:
wd.Manage().Window.Maximize(); ==> to maximize the browser window

Next 2 lines are for finding email box, password box and input (SendKeys) its values. The last line is for finding login button (it depends on the language used on the browser, mine is Vietnamese ). See below picture for more understanding:


Why I don't use @id to find login button? Because I recognize that Facebook changes this id frequently. So I use its value instead of.

Walking through Part 1 & Part 2, I believe that you have enough basic knowledge to start your automation test application with Selenium. Let's practice.

Happy coding! Any comment is welcome.


Thursday, July 6, 2017

Learn Selenium (a Test Automation Tool) with C# - Part 1

Selenium is a set of different software tools each with a different approach to supporting test automation. You can read more about Selenium via its website: http://www.seleniumhq.org/docs/01_introducing_selenium.jsp#introducing-selenium

Selenium has 2 version 1.0 and 2.0. During this article, I just mention about Selenium 2.0. Basically, it is used for testing web application by automation program written by Java, C#, Python... To do that, the test application (created by a tester) will control the browser which the web application (need to be tested) runs on via Selenium webdriver. The browser can be Chrome, FireFox, Internet Explorer... Each browser has a corresponding webdriver to control it.

In this post, I want to introduce Selenium with C#. To start, you must install MS Visual Studio - MSSV (2015 community is preferred) and download Selenium client & webdriver. Below are steps to create

1. Open MSVS and create new C# Windows project, see the following picture for example:

2. Add references for Selenium client & webdriver. There are 2 ways.
     2.1 Use Add Reference menu:


     2.2 Use Manage NuGet Packages menu:


I prefer 2.1 way. If you use Chrome Webdriver, you need to download the latest version from: http://chromedriver.storage.googleapis.com/index.html and unpack it into your project folder. Now you can create a simple test application.

3. Code your test application. Below is simple code for opening Chrome with google.com website
using OpenQA.Selenium;
using OpenQA.Selenium.Chrome;

namespace SeleniumTutorial
{
    class Program
    {
        static void Main(string[] args)
        {
            IWebDriver wd = new ChromeDriver(@"E:\working\abc\SeleniumTutorial");
            wd.Url = "http://google.com";
        }
    }
}


In which, @"E:\working\abc\SeleniumTutorial" is the folder containing Chrome Webdriver (chromedriver.exe).

Yeah! We already knew how to start a C# project with Selenium. I think that's enough for Part 1. In Part 2, we will learn more details how to code a test application with some real test scenarios, for example how to login Facebook automatically.

Any comment is welcome. Have a great day!

Subscribe to RSS Feed Follow me on Twitter!