Friday, May 10, 2013

Web trends in 2013: HTML + CSS3 + Responsive


“HTML5 + CSS3 + Responsive“ is web trends in 2013 because the number of mobile users increases quickly, and become the center of web world today. So it is important to develop a web page that has:

  1. Flexibility to support many type of screen views, including phone, tablet, desktop and even a large TV screen
  2. Ability to support different browsers, e.g IE, FireFox, Chrome, Safari
  3. High integrity with other platforms or scripts, e.g. SQL, PHP, .Net, Java and Javascripts
  4. Sustainability for a longer period
  5. Search engine friendly

Below are some pictures to help explain the usage and features of HTML5, CSS3, and responsive designs.

HTML5 Past, Present & Future


CSS3 and Most Important Properties


What is Responsive Web Design


Hope you can understand what & why HTML + CSS3 + Responsive is so important for web technology in 2013 and future.

Tuesday, April 9, 2013

Solving Error 1001: Unable to get installer types

First let check if your PC has Windows installer service. If having, the reason is your build project on MS Visual Studio has Custom Action with the InstallerClass property set to true, but either no installer classes could be found in the setup.exe or the setup.exe could not be loaded due to missing dependencies.

There are 2 ways to solve this problem:
1. If you have MS Visual Studio projects. Rebuild your projects: make sure you have installer class in main project and select it on Custom Action (right click on the installer project, selecting View and then Custom Actions). Then correct reference Dlls.

2. If you don't have the installer project. Check missing Dlls by using fuslogvw.exe. Below is the guide for quick how to use fuslogvw.exe.

Find fuslogvw.exe tool:
-MS VS 2008: C:\Program Files\Microsoft SDKs\Windows\v6.0A\bin\fuslogvw.exe
-MS VS 2010: C:\Program Files (x86)\Microsoft SDKs\Windows\v7.0A\Bin\FUSLOGVW.exe, and C:\Program Files (x86)\Microsoft SDKs\Windows\v7.0A\Bin\NETFX 4.0 Tools\1033\flogvwrc.dll


Copy this tool to a folder on the target computer.
Create logging folder, e.g. c:\fuslog
Start FUSLOGVW.exe. Update the following settings:
    Log all binds to disk
    Enable Custom log path
    Custom lag path = c:\fuslog\
Finally, enable assembly binding logging in the registry by setting the HKEY_LOCAL_MACHINE\SOFTWARE\Microsoft\Fusion to 1.

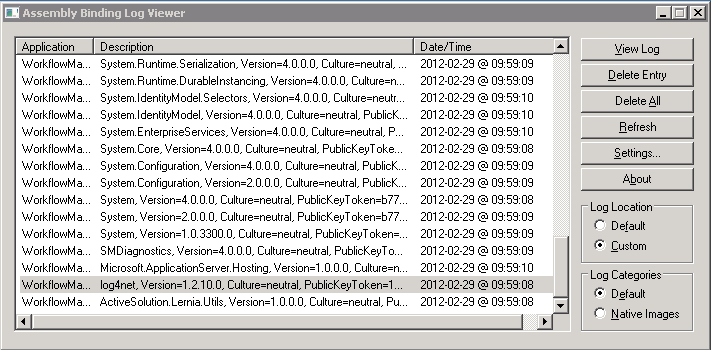
Click Refresh button in FUSLOGVW.exe and behold! A list of assembly binding events will be displayed here:


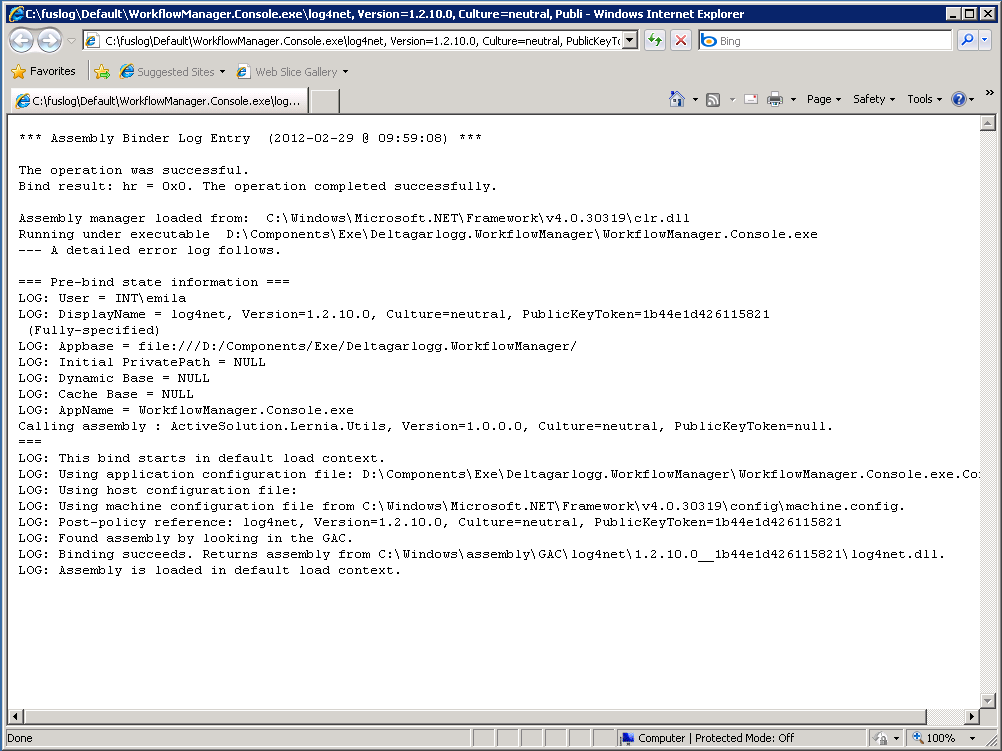
The individual events contain useful details:


Hope you can solve this error.

Sunday, March 17, 2013

Joomla: hide backend with secret key to enhance security

If your website uses Joomla, it is easy to try login your back-end at the address: <your_website>/administrator/

Bad guys can attack your back-end with some technique, e.g. Dictionary attack.

There are many solutions to protect your back-end. Here, I suggest a way with small change in the file: administrator/index.php. Let add the following code after require_once lines:


$session =& JFactory::getSession();
$passport = $session->get('passport');
if(!$passport || $passport != "passed")
{
$goent = JRequest::getVar('your_secret_var','','get','text');
if(!$goent || $goent != "your_secret_value")
{
// Redirect to homepage
header('Location:  ../index.php');
}
else
{
$session->set('passport', 'passed');
}
}

After adding this code, you must login at: <your_website>/administrator/index.php?your_secret_var=your_secret_value

Any attempt to access <your_website>/administrator/ will redirect to your home page.

Best wishes.


Monday, February 18, 2013

Html image map: create multi-links in one image

Html image map will help you create multi-links on an image.

What is html image map?
Html image map is a way that allow you to define certain area to be linked within a single image on a web page. This means that, rather than having to link the whole image as one link, you can have lots of different links within that one image.


Here is a sample for the map tag:
<map name="map-name">
    <area shape="area shape"
    coords="area coordinates"
    href="area hyperlink" or nohref="nohref"
    target="hyperlink target"
    title="area title"
    alt="alternate text"/>
</map>
<img src="image-url" usemap="#map-name" />

For shape attribute (in area tag), it can be rect | circle | poly | default.


For coords attribute, below is a simple overview diagram for the coordinates.
Image Map Coordinates Overviews
How to calculate the coordinates?
Using Photoshop, first load the image into Photoshop, press F8 for the Info Panel to appear, move your cursor to centre of the circular logo and note down the coordinates.


Centre of Circle


We will also need to find the radius of the circle. By finding out the difference between the edge of the circle's coordinates and centre coordinates of the circle, or by using the rule tools in Photoshop. Either way will help you find out the radius of the circle.
Circle Radius
Now let's find the coordinates for a rectangular logo. You just have to find out the top left and bottom right coordinates of the rectangular logo. Using the same method above you will be able to find the coordinates easily.
Rectangular Coordinates
Once you have find out all the coordinates for each logo, now everything is easy. Just follow the attributes for the Map Tag listed above and enter all the coordinates for each of the shapes you have found.


<map name="logos">
    <area shape="circle" coords="68,56,33" href="http://www.stumbleupon.com/" title="StumbleUpon" alt="StumbleUpon" />
    <area shape="rect" coords="220,19,306,54" href="http://www.youtube.com/" title="Youtube" alt="Youtube" />
    <area shape="rect" coords="367,32,516,84" href="http://www.google.com/" title="Google" alt="Google" />
    <area shape="rect" coords="556,12,639,115" href="http://www.wikipedia.com/" title="Wikipedia" alt="Wikipedia" />
    <area shape="rect" coords="128,62,244,114" href="http://www.skype.com/" title="Skype" alt="Skype" />
    <area shape="rect" coords="301,103,444,136" href="http://www.yahoo.com/" title="Yahoo" alt="Yahoo" />
    <area shape="rect" coords="25,158,135,207" href="http://www.ebay.com/" title="eBay" alt="eBay" />
    <area shape="rect" coords="180,147,271,175" href="http://www.flickr.com/" title="Flickr" alt="Flickr" />
    <area shape="rect" coords="299,166,379,208" href="http://www.digg.com/" title="Digg" alt="Digg" />
    <area shape="circle" coords="500,184,32" href="http://wordpress.org/" title="Wordpress.org" alt="Wordpress.org" />
    <area shape="rect" coords="599,142,667,209" href="http://www.blogger.com/" title="Blogger" alt="Blogger" />
    <area shape="default" nohref="nohref" title="Default" alt="Default"/>
</map>


For custom shape link, you can try poly shape attribute. Just defining those important coordinates and it will form up a more precise Hot Spot area for the link.

Web tool to generate image map links:
If these above steps are too complex to you, you can use this online tool to generate html code for links on an image. It will let you select areas on the image, put link and give you html code. Here is the website:
www.image-maps.com


Friday, January 11, 2013

Using Windows commands to split & combine files

For big file, e.g. video, some times you need to split for transfering / uploading and combine them after downloading. Below are some usefull Windows commands for you.

1. Command to split a big file to smaller files (e.g. 512 MB):
#split -b 512m big_file_name

2. Command to combine small files (e.g. small_file1, small_file2, small_file3) to bigger file:
#copy /b small_file* big_file_name /b
Subscribe to RSS Feed Follow me on Twitter!