Tuesday, July 12, 2016

Ionic 2: FormBuilder and Validator

In the article "Learn Ionic 2 with Authentication by JWT", you may know how to make a login page and navigate between pages after login.

In this article, we are going to improve the Signup form of Login page with FormBuilder and Validation which are strong weapons of Angular 2.

1. Add an URL to check existing user in the authentication server
Open the file user-routes.js in the authentication server, add new function to check a username if existing:
app.post('/check', function(req, res) {
  var userScheme = getUserScheme(req);
  if (!userScheme.username) {
    return res.status(400).send("You must send a username");
  }

  if (_.find(users, userScheme.userSearch)) {
   return res.status(400).send("A user with that username already exists");
  }

  res.status(201).send({username: "OK"});
});


Then start the server by using the command:
#node server.js

2. Mofidy file app/providers/auth-service/auth-service.ts
Open this file and add new member and method (function) to check a user as the following:
CHECK_URL = "http://localhost:3001/check";
check(user) {
        return new Promise((resolve, reject) => {
            this.http.post(this.CHECK_URL, JSON.stringify({username: user}), { headers: this.contentHeader })
                .map(res => res.json())
                .subscribe(
                    data => {
                        resolve(data)
                    },
                    err => {
                        reject(err)
                    }
                );
        });
}


3. Add new file app/validators/password.ts
It is used to validate the password input in Signup form. This file has content as below:
import {Control} from '@angular/common';
export class PasswordValidator {
    static checkPassword(control: Control) {
        // password must be between 4 and 10 characters and have at least 1 number
        if (control.value.match(/^(?=.*[0-9])[a-zA-Z0-9!@#$%^&*]{4,10}$/)) {
            return null;
        } else {
            return { 'invalidPassword': true };
        }
    }
}


4. Modify app/pages/login/login.ts
This file is modified as below:
import {Page, NavController} from 'ionic-angular';
import {FormBuilder, ControlGroup, Validators } from '@angular/common';
import {AuthService} from '../../providers/auth-service/auth-service';
import {WorkPage} from '../work/work';

import {PasswordValidator} from  '../../validators/password';
@Page({
  templateUrl: 'build/pages/login/login.html',
})
export class LoginPage {
    authType: string = "login";
    usernameIsValid: boolean = false;
   
   
constructor(private auth: AuthService, private nav: NavController, private formBuilder: FormBuilder) {
        this.signupCreds = formBuilder.group({
          'username': ['', Validators.compose([Validators.required, Validators.pattern('[a-zA-Z]*')])],
          'password': ['', PasswordValidator.checkPassword],
          'email': ['', Validators.required]
        });
    }


    checkUsername(username){
        if(username.length < 4) { //username must have at least 4 characters
          this.usernameIsValid = false;
          return;
        }
        this.auth.check(username.toLowerCase()).then(
          (success) => {
            this.usernameIsValid = true;
          },
          (err) => {
            this.usernameIsValid = false;
          }
        );
    }

   
    login(credentials) {
        this.auth.login(credentials).then(
          (success) => {
            this.nav.setRoot(WorkPage);
          },
          (err) => console.log(err)
        );
    }
   
    signup(credentials) {
        this.auth.signup(credentials).then(
          (success) => {
            this.nav.setRoot(WorkPage);
          },
          (err) => console.log(err)
        );
    }
}


The new BLUE codes are added / modified. Pay your attention on the constructor which I use FormBuilder to created signupCreds form and bind its controls to Validators. As you can see the password control use PasswordValidator.checkPassword to validate input password.

4. Modify app/pages/login/login.html
Let modify the signup form as the following:
<form *ngSwitchWhen="'signup'" [ngFormModel]="signupCreds" (ngSubmit)="signup(signupCreds.value)">
        <ion-item>
          <ion-label>Username</ion-label>
          <ion-input (change)="checkUsername(signupCreds.controls.username.value)" type="text" ngControl="username"></ion-input>
        </ion-item>
        <p *ngIf="signupCreds.controls.username.hasError('required') && signupCreds.controls.username.touched" danger>Username is required</p>
        <p *ngIf="signupCreds.controls.username.touched && !usernameIsValid" danger>User is invalid or taken</p>
        <p *ngIf="signupCreds.controls.username.touched && usernameIsValid" secondary> User is OK</p>
       
        <ion-item>
          <ion-label>Password</ion-label>
          <ion-input type="password" ngControl="password"></ion-input>
        </ion-item>
        <p *ngIf="!signupCreds.controls.password.valid && signupCreds.controls.password.touched" danger>Password is not meet standards</p>
        <p *ngIf="signupCreds.controls.password.valid && signupCreds.controls.username.touched" secondary> Password is good</p>


        <ion-item>
          <ion-label>Email</ion-label>
          <ion-input type="email" placeholder="Your email" ngControl="email"></ion-input>
        </ion-item>
        <p *ngIf="signupCreds.controls.email.hasError('required') && signupCreds.controls.email.touched" danger>Email is required</p>
       
        <div padding>
          <button block [disabled]="!usernameIsValid || !signupCreds.controls.password.valid || !signupCreds.controls.email.valid" type="submit">Signup</button>
        </div>
</form>


While email uses a standard Validator and password uses a customized Validator, username uses event change of the control to validate an input username. This will help to reduce number of calls to the authentication server to check the input username. If not, it will call the authentication server when keying every character in Username box.

Beside that, in this new form, you can not click Signup button if any control is invalid. Each control will have a message to inform you it is OK or not.

Now you can run ionic serve then try this new signup form. Here is my screen:

Hope this article can help you on developing your app on Ionic 2.
Happy coding! Cheers.


Sunday, July 10, 2016

Ionic: How to solve CORS issue

What is CORS?
CORS = Cross Origin Resource Sharing

When developing an Ionic app, do you ever get the error: No 'Access-Control-Allow-Origin' header is present on the requested resource

It is caused by an Ajax call (XMLHttpRequest) to another site when you run your app in the browser by the command ionic serve or ionic run. It won't occur when your app is built and load to platform (iOS/Android).

To solve this problem and get your app run smoothly on the browser like on the platform iOS/Android, let use Chrome and install this extension: https://chrome.google.com/webstore/detail/allow-control-allow-origi/nlfbmbojpeacfghkpbjhddihlkkiljbi


Instead of uploading your app to the platform iOS / Android which taking your time. Using above Chrome extension will help you develop and test your app faster.

Happy coding! Welcome any command.

Friday, June 10, 2016

SQL Server Management Studio: check size of tables

In MS SQL, checking / monitoring size of tables is important to manage spaces and optimize SQL performance.

You can use a SQL script in this article, but also some easier ways in SQL Server Management Studio (SSMS). You can do as one of the following way:

1. Right click on the database, select Reports > Standard Reports > Disk Usage By Table


2. Or press F7 to  view Object Explorer Details, navigate to Tables view, then right click on the header and select Data Space Usage column:

You can sort on the column.

Happy working!

Thursday, May 19, 2016

Learn Ionic 2 with Authentication by JWT

Auth0 team has a great post about How to secure your mobile app with JWT (Json Web Tokens). In this article, I want to modify its AuthService service with full functions. So you can reuse this code in any your project. Addition, I also show you how to navigate between pages after authenticated.

Step 1: start your project
#ionic start ionic-auth-jwt-sample blank --v2 --ts

Step 2: add angular2-jwt. I use version @0.1.12 because the latest version of angular2-jwt has problem with latest version of ionic 2 + angular:
#cd ionic-auth-jwt-sample
#npm install angular2-jwt@0.1.12

Step 3: install authenticate server
+Copy the source code from here
+Go to the folder copied, run the server
#npm install
#node server.js

Step 4: generate AuthService and modify its code
#ionic g provider AuthService

Then edit file app/providers/auth-service/auth-service.ts as below:

import {Injectable} from 'angular2/core';
import {Http, Headers} from 'angular2/http';
import {Storage, LocalStorage} from 'ionic-angular';
import {JwtHelper, tokenNotExpired} from 'angular2-jwt';
import 'rxjs/add/operator/map';

@Injectable()
export class AuthService {
    LOGIN_URL: string = "http://localhost:3001/sessions/create";
    SIGNUP_URL: string = "http://localhost:3001/users";
    contentHeader: Headers = new Headers({"Content-Type": "application/json"});
    local: Storage = new Storage(LocalStorage);
    jwtHelper: JwtHelper = new JwtHelper();
    user: string;
    error: string;

    constructor(private http: Http) {
        let token = localStorage.getItem('id_token');
        if (token) {
            this.user = this.jwtHelper.decodeToken(token).username;
        }
    }

    public authenticated() {
        return tokenNotExpired();
    }

    login(credentials) {
        return new Promise((resolve, reject) => {
            this.http.post(this.LOGIN_URL, JSON.stringify(credentials), { headers: this.contentHeader })
                .map(res => res.json())
                .subscribe(
                    data => {
                        this.authSuccess(data.id_token);
                        resolve(data)
                    },
                    err => {
                        this.error = err;
                        reject(err)
                    }
                );
        });
    }

    signup(credentials) {
        return new Promise((resolve, reject) => {
            this.http.post(this.SIGNUP_URL, JSON.stringify(credentials), { headers: this.contentHeader })
              .map(res => res.json())
              .subscribe(
                  data => {
                    this.authSuccess(data.id_token);
                    resolve(data)
                  },
                  err => {
                    this.error = err;
                    reject(err)
                  }
              );
        });
    }

    logout() {
        this.local.remove('id_token');
        this.user = null;
    }

    authSuccess(token) {
        this.error = null;
        this.local.set('id_token', token);
        this.user = this.jwtHelper.decodeToken(token).username;
    }

}

Step 5: generate LoginPage and WorkPage
#ionic g page Login
#ionic g page Work

Then edit file app/pages/login/login.ts as below:

import {Page, NavController} from 'ionic-angular';
import {AuthService} from '../../providers/auth-service/auth-service';
import {WorkPage} from '../work/work';

@Page({
  templateUrl: 'build/pages/login/login.html',
})
export class LoginPage {
    authType: string = "login";
   
    constructor(private auth: AuthService, private nav: NavController) {
    }
   
    login(credentials) {
        this.auth.login(credentials).then(
          (success) => {
            this.nav.setRoot(WorkPage);
          },
          (err) => console.log(err)
        );
    }


    signup(credentials) {
        this.auth.signup(credentials).then(
          (success) => {
            this.nav.setRoot(WorkPage);
          },
          (err) => console.log(err)
        );
    }

}


Edit file app/pages/login/login.html as below:

<ion-navbar *navbar>
  <ion-title>Login</ion-title>
</ion-navbar>

<ion-content class="login" *ngIf="!auth.authenticated()">
 
    <div padding>
      <ion-segment [(ngModel)]="authType">
        <ion-segment-button value="login">
          Login
        </ion-segment-button>
        <ion-segment-button value="signup">
          Signup
        </ion-segment-button>
      </ion-segment>
    </div>
   
    <div [ngSwitch]="authType">
      <form *ngSwitchWhen="'login'" #loginCreds="ngForm" (ngSubmit)="login(loginCreds.value)">
        <ion-item>
          <ion-label>Username</ion-label>
          <ion-input type="text" ngControl="username"></ion-input>
        </ion-item>
       
        <ion-item>
          <ion-label>Password</ion-label>
          <ion-input type="password" ngControl="password"></ion-input>
        </ion-item>
       
        <div padding>
          <button block type="submit">Login</button>       
        </div>
       
      </form>
      <form *ngSwitchWhen="'signup'" #signupCreds="ngForm" (ngSubmit)="signup(signupCreds.value)">
        <ion-item>
          <ion-label>Username</ion-label>
          <ion-input type="text" ngControl="username"></ion-input>
        </ion-item>
       
        <ion-item>
          <ion-label>Password</ion-label>
          <ion-input type="password" ngControl="password"></ion-input>
        </ion-item>
       
        <div padding>
          <button block type="submit">Signup</button>
        </div>
       
      </form>
    </div>
   
    <div padding>
      <p *ngIf="error" class="error">{{ error._body }}</p> 
    </div>
 
</ion-content>


Edit file app/pages/work/work.ts as below:

import {Page, NavController} from 'ionic-angular';
import {AuthService} from '../../providers/auth-service/auth-service';
import {LoginPage} from '../login/login';

@Page({
  templateUrl: 'build/pages/work/work.html',
})

export class WorkPage {
  constructor(private auth: AuthService, private nav: NavController) {}
 
  logout() {
    this.auth.logout();
    this.nav.setRoot(LoginPage);
  }
}


Edit file app/pages/work/work.html as below:

<ion-navbar *navbar>
  <ion-title>Work</ion-title>
</ion-navbar>

<ion-content padding class="tools">
  <div *ngIf="auth.authenticated()">
    <div padding>
      <h1>Welcome {{ auth.user }}! Let do your job then Logout.</h1>
      <button block (click)="logout()">Logout</button>
    </div> 
  </div>
</ion-content>


Step 6: edit file app/app.ts

import {App, Platform} from 'ionic-angular';
import {StatusBar} from 'ionic-native';
import {LoginPage} from './pages/login/login';
import {Http} from 'angular2/http';
import {AuthHttp, AuthConfig} from 'angular2-jwt';
import {provide} from 'angular2/core';
import {AuthService} from './providers/auth-service/auth-service';

@App({
  template: '<ion-nav [root]="rootPage"></ion-nav>',
  providers: [
      provide(AuthHttp, {
        useFactory: (http) => {
          return new AuthHttp(new AuthConfig, http);
        },
        deps: [Http]
      }),
      AuthService
    ],
  config: {}
})
export class MyApp {
  rootPage: any = LoginPage;

  constructor(platform: Platform) {
    platform.ready().then(() => {
      StatusBar.styleDefault();
    });
  }
}


Step 7: start the app and check.
#ionic serve

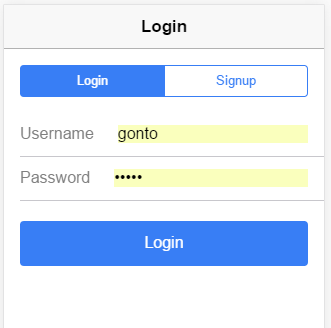
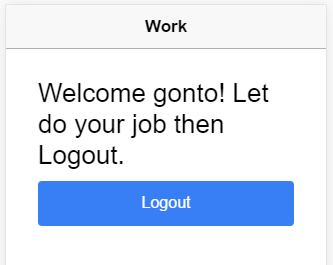
Below are my captured images:


Update: if you care, here is new article for improving signup form with FormBuilder & Validator.

Happy coding! Any comment are welcome.

Monday, April 18, 2016

Get blue screen after login via remote desktop

Hhm, some times you will get a blue screen after login via remote desktop. It's weird and you may be worry. You may wonder "where is my desktop". Below are steps to return your desktop.
+Press CTRL + ALT + END
+Run Task Manager
+Go to File >> Run new task
+Key explorer.exe in the box and click OK to restart Windows Explorer.


Then you can see the desktop again.

Nice day!

Subscribe to RSS Feed Follow me on Twitter!