1. Parameterize
In the sample of merging Excel file with data table, we have 2 connections: Excel Connection (for reading data from Excel source file) and OLE DB Connection (for reading data from data table source). These connections can be changed especially when you deploy your SSIS Project on SQL Server. So it needs to be parameterized.To parameterize a connection, let right click on it (in the bottom of a design screen of a package) the select Parameterize:


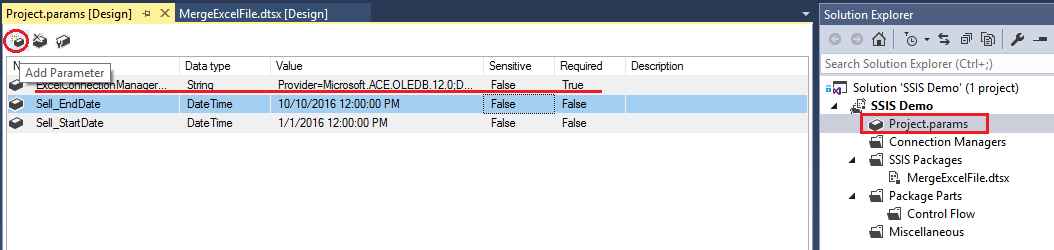
After that, you can see the parameter created in Project.params. You can add other parameters in here. For example, I added 2 new parameters Sell_StartDate and Sell_EndDate to use in next section:
2. Load Data Into Destination Using Look up
In this section, we will transform products sold in a period from SSIS_Demo_Products table to new table SSIS_Demo_Products_Report (assume that it will be used for report purpose). But before loading data into SSIS_Demo_Products_Report, we will look up its data to check if existing data matches with new data or not. Then we will insert or update data.First, create New SSIS Package (e.g. LookupAndLoad.dtsx) >> drag Data Flow into >> double click >> drag OLE DB Source into >> configure it:


Note: We use $Project::Sell_StartDate and $Project::Sell_EndDate parameters (created from above step) for SQL command.
Drag Lookup task into, connect OLE DB Source to it then configure it:


Note: we just need to lookup on ID column.
Now we drag OLE DB Destination into >> connect Lookup to it >> select its input as Lookup No Match Output containing new records >> configure it as below to insert new records into SSIS_Demo_Products_Report:


Next, let drag OLE DB Command into >> connect Lookup to it >> select its input as Lookup Match Output containing existing records >> configure it as below to update existing records:


After done, we have final diagram of Data Flow as the following:

Here are tables before right click Execute Task:


2. Deploy SSIS Package on SQL Server
2.1 Create an SSISDB catalog, if you haven’t already. Below are steps:- Open MS SQL Server Management Studio.
- Connect to the SQL Server Database Engine.
- In Object Explorer, expand the server node, right-click the Integration Services Catalogs node, and then click Create Catalog.

- Click Enable CLR Integration. The catalog uses CLR stored procedures.
- Click Enable automatic execution of Integration Services stored procedure at SQL Server startup to enable the catalog.startup stored procedure to run each time the SSIS server instance is restarted. The stored procedure performs maintenance of the state of operations for the SSISDB catalog. It fixes the status of any packages there were running if and when the SSIS server instance goes down.

- Enter a password, and then click Ok. You'll see this catalog under Integration Services Catalogs. (Make sure SQL Server Integration Services is started).

2.2 Build SSIS project. On MS Visual Studio, right on your solution and Build Solution. Goto bin\Development folder of your solution, then copy .ispac file (e.g. SSIS Demo.ispac) to SQL server.
2.3 Deploy SSIS project to SQL server. On MS SQL Server Management Studio, right click on SSISDB catalog >> select Create Folder >> input folder name (e.g. SSIS_Demo) and click OK >> click on new created folder >> right click on Projects >> select Deploy Project >> click Next button on the popup windows >> Browse to select .ispac file >> click Next button to deploy, it may show a warning, just click OK to skip >> click Next button >> last step, click Deploy button then click Close button:


2.4 Create Environment & setup Parameters.
- Explore new created folder (e.g. SSIS_Demo) >> right click Environments >> select Create Environment >>:

- Give it a name (e.g. Development), then click OK:

- Right click on new created environment (e.g. Development) >> select Properties: >> click tab Variables >> copy and paste the names & values of parameters in SSDT to here >> then click OK:

Note: For parameter of connection string (e.g. ExcelConnectionManager_ConnectionString), you should change the value to new source.
- Configure parameters of the project. Right click on the project (e.g. SSIS_Demo) then select Configure >> add Development environment into References >> open Parameters section >> choose corresponding variable from the environment:


- Let execute packages to see if it works. Right click on a package and select Execute. It will alert to choose a correct environment:


3. Create Agent Job
The last step is to set up an Agent Job to run a package on a schedule. Make sure that SQL Server Agent service is running. Below is series of images for creating an Agent Job:


Done! Now you can start to build your Data warehouse!
Good luck. Any comment is welcome.


This comment has been removed by a blog administrator.
ReplyDelete