Thursday, May 19, 2016

Learn Ionic 2 with Authentication by JWT

Auth0 team has a great post about How to secure your mobile app with JWT (Json Web Tokens). In this article, I want to modify its AuthService service with full functions. So you can reuse this code in any your project. Addition, I also show you how to navigate between pages after authenticated.

Step 1: start your project
#ionic start ionic-auth-jwt-sample blank --v2 --ts

Step 2: add angular2-jwt. I use version @0.1.12 because the latest version of angular2-jwt has problem with latest version of ionic 2 + angular:
#cd ionic-auth-jwt-sample
#npm install angular2-jwt@0.1.12

Step 3: install authenticate server
+Copy the source code from here
+Go to the folder copied, run the server
#npm install
#node server.js

Step 4: generate AuthService and modify its code
#ionic g provider AuthService

Then edit file app/providers/auth-service/auth-service.ts as below:

import {Injectable} from 'angular2/core';
import {Http, Headers} from 'angular2/http';
import {Storage, LocalStorage} from 'ionic-angular';
import {JwtHelper, tokenNotExpired} from 'angular2-jwt';
import 'rxjs/add/operator/map';

@Injectable()
export class AuthService {
    LOGIN_URL: string = "http://localhost:3001/sessions/create";
    SIGNUP_URL: string = "http://localhost:3001/users";
    contentHeader: Headers = new Headers({"Content-Type": "application/json"});
    local: Storage = new Storage(LocalStorage);
    jwtHelper: JwtHelper = new JwtHelper();
    user: string;
    error: string;

    constructor(private http: Http) {
        let token = localStorage.getItem('id_token');
        if (token) {
            this.user = this.jwtHelper.decodeToken(token).username;
        }
    }

    public authenticated() {
        return tokenNotExpired();
    }

    login(credentials) {
        return new Promise((resolve, reject) => {
            this.http.post(this.LOGIN_URL, JSON.stringify(credentials), { headers: this.contentHeader })
                .map(res => res.json())
                .subscribe(
                    data => {
                        this.authSuccess(data.id_token);
                        resolve(data)
                    },
                    err => {
                        this.error = err;
                        reject(err)
                    }
                );
        });
    }

    signup(credentials) {
        return new Promise((resolve, reject) => {
            this.http.post(this.SIGNUP_URL, JSON.stringify(credentials), { headers: this.contentHeader })
              .map(res => res.json())
              .subscribe(
                  data => {
                    this.authSuccess(data.id_token);
                    resolve(data)
                  },
                  err => {
                    this.error = err;
                    reject(err)
                  }
              );
        });
    }

    logout() {
        this.local.remove('id_token');
        this.user = null;
    }

    authSuccess(token) {
        this.error = null;
        this.local.set('id_token', token);
        this.user = this.jwtHelper.decodeToken(token).username;
    }

}

Step 5: generate LoginPage and WorkPage
#ionic g page Login
#ionic g page Work

Then edit file app/pages/login/login.ts as below:

import {Page, NavController} from 'ionic-angular';
import {AuthService} from '../../providers/auth-service/auth-service';
import {WorkPage} from '../work/work';

@Page({
  templateUrl: 'build/pages/login/login.html',
})
export class LoginPage {
    authType: string = "login";
   
    constructor(private auth: AuthService, private nav: NavController) {
    }
   
    login(credentials) {
        this.auth.login(credentials).then(
          (success) => {
            this.nav.setRoot(WorkPage);
          },
          (err) => console.log(err)
        );
    }


    signup(credentials) {
        this.auth.signup(credentials).then(
          (success) => {
            this.nav.setRoot(WorkPage);
          },
          (err) => console.log(err)
        );
    }

}


Edit file app/pages/login/login.html as below:

<ion-navbar *navbar>
  <ion-title>Login</ion-title>
</ion-navbar>

<ion-content class="login" *ngIf="!auth.authenticated()">
 
    <div padding>
      <ion-segment [(ngModel)]="authType">
        <ion-segment-button value="login">
          Login
        </ion-segment-button>
        <ion-segment-button value="signup">
          Signup
        </ion-segment-button>
      </ion-segment>
    </div>
   
    <div [ngSwitch]="authType">
      <form *ngSwitchWhen="'login'" #loginCreds="ngForm" (ngSubmit)="login(loginCreds.value)">
        <ion-item>
          <ion-label>Username</ion-label>
          <ion-input type="text" ngControl="username"></ion-input>
        </ion-item>
       
        <ion-item>
          <ion-label>Password</ion-label>
          <ion-input type="password" ngControl="password"></ion-input>
        </ion-item>
       
        <div padding>
          <button block type="submit">Login</button>       
        </div>
       
      </form>
      <form *ngSwitchWhen="'signup'" #signupCreds="ngForm" (ngSubmit)="signup(signupCreds.value)">
        <ion-item>
          <ion-label>Username</ion-label>
          <ion-input type="text" ngControl="username"></ion-input>
        </ion-item>
       
        <ion-item>
          <ion-label>Password</ion-label>
          <ion-input type="password" ngControl="password"></ion-input>
        </ion-item>
       
        <div padding>
          <button block type="submit">Signup</button>
        </div>
       
      </form>
    </div>
   
    <div padding>
      <p *ngIf="error" class="error">{{ error._body }}</p> 
    </div>
 
</ion-content>


Edit file app/pages/work/work.ts as below:

import {Page, NavController} from 'ionic-angular';
import {AuthService} from '../../providers/auth-service/auth-service';
import {LoginPage} from '../login/login';

@Page({
  templateUrl: 'build/pages/work/work.html',
})

export class WorkPage {
  constructor(private auth: AuthService, private nav: NavController) {}
 
  logout() {
    this.auth.logout();
    this.nav.setRoot(LoginPage);
  }
}


Edit file app/pages/work/work.html as below:

<ion-navbar *navbar>
  <ion-title>Work</ion-title>
</ion-navbar>

<ion-content padding class="tools">
  <div *ngIf="auth.authenticated()">
    <div padding>
      <h1>Welcome {{ auth.user }}! Let do your job then Logout.</h1>
      <button block (click)="logout()">Logout</button>
    </div> 
  </div>
</ion-content>


Step 6: edit file app/app.ts

import {App, Platform} from 'ionic-angular';
import {StatusBar} from 'ionic-native';
import {LoginPage} from './pages/login/login';
import {Http} from 'angular2/http';
import {AuthHttp, AuthConfig} from 'angular2-jwt';
import {provide} from 'angular2/core';
import {AuthService} from './providers/auth-service/auth-service';

@App({
  template: '<ion-nav [root]="rootPage"></ion-nav>',
  providers: [
      provide(AuthHttp, {
        useFactory: (http) => {
          return new AuthHttp(new AuthConfig, http);
        },
        deps: [Http]
      }),
      AuthService
    ],
  config: {}
})
export class MyApp {
  rootPage: any = LoginPage;

  constructor(platform: Platform) {
    platform.ready().then(() => {
      StatusBar.styleDefault();
    });
  }
}


Step 7: start the app and check.
#ionic serve

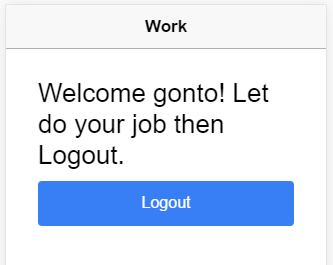
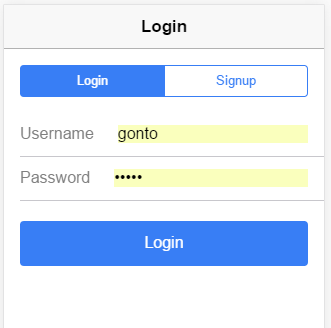
Below are my captured images:


Update: if you care, here is new article for improving signup form with FormBuilder & Validator.

Happy coding! Any comment are welcome.

Monday, April 18, 2016

Get blue screen after login via remote desktop

Hhm, some times you will get a blue screen after login via remote desktop. It's weird and you may be worry. You may wonder "where is my desktop". Below are steps to return your desktop.
+Press CTRL + ALT + END
+Run Task Manager
+Go to File >> Run new task
+Key explorer.exe in the box and click OK to restart Windows Explorer.


Then you can see the desktop again.

Nice day!

Friday, April 15, 2016

The first journey to learn Ionic 2


1. Introduce about Ionic 2
At the time I'm writing this article, Ionic 1 already had a big success while Ionic 2 and Angular 2 is coming GA (general available).
If you just start with Ionic, this is the good time for learning Ionic 2 and Angular 2.

2. Why Ionic 2 is better
Compare with Ionic 1, Ionic 2 has some things better as the following:

2.1 Ionic 2 app is organized in a better structure vs. Ionic 1

Below is the structure of files and folders in a Ionic project:
appThis folder will contain all the code you're going to write for the app, ie. the pages and services.
hooksThis folder contains scripts that can be executed as part of the Cordova build process. This is useful if you need to customize anything when you're building the app packages.
node_modulesIonic projects use npm to import modules, you'll find all imported modules here.
resourcesThis folder contains the icon and splash images for the different mobile platforms.
typingsThis folder contains type definition files for external modules that are not written in TypeScript.
wwwThis folder contains the index.html, remember all the app code should be in the app folder, not in the www folder.
config.xmlThis file contains the configuration for Cordova to use when creating the app packages.
ionic.config.jsConfiguration used by the Ionic CLI when excuting commands.
package.jsonThis file contains the list of all npm packages that have been installed for this project.
tsconfig.jsonConfiguration for the TypeScript compiler.
webpack.config.jsThis file contains the configuration for WebPack, which will create a bundle from the modules in the app.

2.2 Ionic 2 supports to create pages just by a simple command:
#ionic generate page YourPage
or
#ionic g page YourPage

2.3 Ionic 2 has cleaner syntax than Ionic 1, here are some examples:
Ionic 1: <img ng-src="{{photo.image}}" />
Ionic 2: <img [src]="photo.image" />

Ionic 1: <button ng-click="doSomething()">
Ionic 2: <button (click)="doSomething()">

You can see the code of Ionic 2 is easier to read than Ionic 1.

2.4 Ionic 2 has navigation mechanism better than Ionic 1, any time you want to navigate to a page, just push it into the navigation stack:
this.nav.push(YourPage);

When you want to go back the previous page, jus pop the current page out of the navigation stack:
this.nav.pop(YourPage);

2.5 Ionic 2 supports TypeScript and ES6, this allows you code take advantages of TypeScript and ES6 which will be supported natively in browsers in near future. However Ionic 2 will help translate TypeScript to JavaScript, so you don't worry.

2.6 Ionic 2 supports Components feature of Angular 2. Components allow you to quickly construct an interface for your app. You can build your specific Component or use existing Components of Ionic 2 such as modals, popups, and cards.
When you need  to use a Component, just go to http://ionicframework.com/docs/v2/components/

3. Decorators in Ionic 2

Decorators is main concept in Ionic 2. It contains configurations for a class such as template, providers, etc. Here is the general format of a class:

@Decorator({
    /*configurations*/
})
export class MyClass {
    /*functions*/
}


A decorator can be: @App, @Page, @Directive, @Component, @Pipe, @Injectable

@App: the root component where starts the other components in your app. It often is bound with a root page. Below is an example:
@App({
  template: `<ion-nav [root]="root"></ion-nav>`
  config: {
    backButtonText: 'Go Back',
    iconMode: 'ios',
    modalEnter: 'modal-slide-in',
    modalLeave: 'modal-slide-out',
    tabbarPlacement: 'bottom',
    pageTransition: 'ios',
  }
})


@Page: a page (view) component which is often specified by a template. Your app is a set of pages. Below is an example:
@Page({
    templateUrl: 'build/pages/mypage/mypage.html'  
})
export class MyPage {

}

@Directive: a custom directive which can be used in a Page or Component. Here is an example:
import {Directive} from 'angular2/core';
@Directive({
  selector: 'foo',
  template: './foo.html'
)}
export class FooDirective { }


And it is used in a Page:
import {FooDirective} from './foo'
@Page({
  templateUrl: '../page.html',
  directives: [FooDirective],
})


@Component: a built-in or custom component (module) has an interface and functionalities. Ionic 2 has many built-in Components, but you can make a custom component whatever you want as long as it fits your app. The following is a sample of a custom Component:
@Component({
  selector: 'custom-component',
  template: `
    <h1>My awesome custom component</h1>
    <ion-list>
      <ion-item>
        I am an awesome ionic component.
      </ion-item>
    </ion-list>
  `,
  directives: [IONIC_DIRECTIVES]
})
class MyComponent {

}

@Pipe: a data filter. Below is an example:
import {Pipe} from 'angular2/core'
@Pipe({
 name: 'myPipe'
})
export class MyPipeClass{
 transform(value, args) {
  return value;
 }
}


Use this pipe in HTML:
value | myPipe:args[0]:args[1]

@Injectable: a service which can be injected into another module. Here is a sample:

@Injectable()
export class DataService {
}


Use it in a page:
@Page({
  templateUrl: 'build/pages/my-page/my-page.html',
  providers: [DataService],
  directives: [MyCoolDirective, MyCoolerDirective],
  pipes: [MyPipe]
})


Hope you can start your journey with Ionic 2 after reading this article.

Happy coding!

Friday, March 18, 2016

Free SSL Certificate with Let's Encrypt

Encrypting your website's traffic is very important to protect your customer info and also get higher ranking in Google search (according to Google announcement on HTTPS). Google's search results will favor encrypted sites over those that are insecure, and the weighting that secure sites are given will only increase over time. Day by day, the websites use HTTPS are getting higher ranking than others not using HTTPS which will be alerted by famous browsers (Chrome, Firefox) as insecure website. Then you can image how it affect to your customers.

To make your website fully encrypted and authorized, normally you have to buy a "secure certificate" (SSL Certificate). This certificate, issued by a trusted third party, would then be installed on your site to confirm to your visitors that your website is encrypted (secured) and who you are.

Nothing is matter if you have $$$. But in this article, I want introduce a free solution with Let's Encrypt. To know how it works, please read this document. Basically, Let's Encrypt provides a mechanism working on top a protocol called ACME (Automated Certificate Management Environment) which allows to create your secure certificates manually then validate,  sign, install and even renew them automatically.

If you're using Debian-based OS, you can read the official document for quick start. I hope in future, Let's Encrypt will have an official tool to support Windows IIS. But to live before that time, we also have some clients (provided by third parties) to get and manage the secure certificate from Let's Encrypt if you own a Windows IIS server.

1. ACMESharp
It is an ACME library and client for the .NET platform. It uses PowerShell to configure. Read here for quick start.

2. letsencrypt-win-simple
It is built on top of ACMESharp for supporting Windows CLI instead of PowerShell. You can read its Command Line Arguments here.

3. Certify for Windows
It is an application with GUI for Windows (also based on ACMESharp) which uses the Let's Encrypt service to provide free trusted SSL certificates for websites you control.
Certify will automatically configure your website on IIS with Let's Encrypt. After creating New Certificate for your domain, let check http://{your site}/.well-known/acme-challenge/configcheck to see if you can access this file. Let's Encrypt service requires to access this file to issue a certificate for you. If you cannot access this file, you must edit web.config file in same folder or follow here to configure Extension Static Files on IIS.


Remember that the certificate only valid in 90 days. So you should renew it on time. Just open it in Certify then click Renew button.

Currently Let's Encrypt just supports single domain certificate, hope in future it can support multi-domains certificate. Let wait.

Thanks for your reading.

Tuesday, March 1, 2016

Visual Studio Code: how to work with GitHub

Visual Studio Code (VSC)  is powerful editor for developer in web app project. I like to use it in my project relating to Angular. GitHub provides public git repositories for community.

Below are steps to help you work with your GitHub from your project on VSC:

1. Install git
+Download and install GIT from: http://git-scm.com/downloads
+If you use Windows, let set PATH environment includes the folder which GIT is installed
+Check if GIT works by the command: # git --version

2. Create an empty repository on your GitHub and get its URL. To avoid errors, do not initialize the new repository with README, license, or gitignore files. You can add these files after your project has been pushed to GitHub. For example my repository is: https://github.com/vnheros/ionic-test-FB-login

3. Use command line, go to your project folder. Configure your GIT global user & email (this step just is needed to do one time, you don't need to redo for later projects):
# git config --global user.email "your email"
# git config --global user.name "your name"

4. Open your project on VSC and initialize git repository for your project:

Or you can run the command:
# git init

5. Create a README.md and commit all files in the folder to your repository on GitHub, below is command lines for example:
# echo "blah blah about the project" >> README.md
# git add README.md
# git commit -m "first commit"
# git remote add origin https://github.com/vnheros/ionic-test-FB-login.git
# git push -u origin master


Note:
+You must replace my https://github.com/vnheros/ionic-test-FB-login.git by the URL of your repository. Don't forget suffix .git in the end of the URL.
+Last command will require you input username & password of your account on GitHub
+Use .gitignore file to skip folders which you don't want to submit to GitHub
+Use http://dillinger.io/ to edit & check your README.md, then copy & paste it to VSC

Now your project is binding with the repository on GitHub, you can use GIT function on VSC to add and commit any files when changing.

Happy codding! Welcome any comments!


Subscribe to RSS Feed Follow me on Twitter!