Tuesday, March 3, 2020

Setup Gitea on Windows

Gitea is an open source project that supports to make a self-hosted Git service. There are many free Git services like Github but when you host a private Git project, you must pay. So Gitea is one of the best choices when you need to manage private Git projects on your own on-prem version control server.

In previous article, I show howto setup Git Server on Windows with OpenSSH. In this article, I will show howto setup Gitea on Windows.

1. Download & Install Gitea
Select a latest Gitea built for Windows and download it from: https://dl.gitea.io/gitea (e.g. gitea-1.9.6-windows-4.0-386.exe depending on your Windows).
Copy this file to a folder (e.g. C:\Gitea) and rename it to gitea.exe.
Run C:\Gitea\gitea.exe from Windows cmd:


Go to http://127.0.0.1:3000/ to configure initial configuration database. Gitea supports Microsoft SQL, MySQL, PostgreSQL and SQLite databases. Click "Sign In" button on the top left, then choose a database type you had, for me I select MSSQL:


Fill in necessary info. In Optional Settings >> Administrator Account Settings, let add an username (e.g. giteaadmin), it will be used as the administrator account for Gitea.

Then click "Install Gitea" button. After that you can sign in to the Gitea portal.
To change settings, you can modify the file C:\Gitea\custom\conf\app.ini, for example I add below lines to make English as default language for the Gitea portal:
[i18n]
LANGS = en-US
NAMES = English
2. Run Gitea as Windows service
To start Gitea portal, you must run C:/Gitea/gitea.exe from Windows cmd or PowerShell. For convinient, let create a Windows service to start it automatically.
Terminate C:/Gitea/gitea.exe if it is running, open Windows cmd as Administrator and run the following command:
sc create GiteaService start= auto binPath= ""C:\Gitea\gitea.exe" web --config "C:\Gitea\custom\conf\app.ini""
Open Windows Services and start GiteaService, then open website http://localhost:3000/ to check if working.

3. Create project repo and add user (collaborator)
Sign-in with admin user, on the Dashboard >> Repository area click + button to add new project repo:

Fill in project info:

Click "Create Repository" button. Now you have a repo for your project. Creator will be administrator for this repo as default.
Next let create user and add it to the project. Go to Site Administration >> User Accounts >> click Create User Account button to create new user:


Open the project, from its Settings >> Collaborators >> key the username of collaborator then click Add Collaborator button: 


4. Work as a collaborator on Git portal
Create user for each collaborator (developer). On the PC of collaborator, open Gitea portal via link: http://<IP server>:3000/ (e.g. http://192.168.10.101:3000/).
In case of you want to access your projects via Internet, you can setup https with a domain. See guidelines here:  https://docs.gitea.io/en-us/https-setup/
In case of you just want to access your projects within your LAN/VPN, you can simply use server IP.
After login, each developer will see projects joined. For example:

Pay attention on the http link of Git project, e.g.: http://localhost:3000/itgitad/TestProject.git
Replace localhost by server IP (e.g. http://192.168.10.101:3000/itgitad/TestProject.git) ==> you will have the right link of this Git project for working in local repo.

On this portal, developer can use functions like on GitHub.com. Oh lala...

5. Work on local repo
On your computer, open Windows cmd, cd to the folder that you want to make a local repo for your project, run the following commands:
git init
git remote add origin http://192.168.10.101:3000/itgitad/TestProject.git
git pull origin master
After above commands, it will download latest info + source from remote repo to your local repo. Change/add a file, then push to the server:
git add NewFile.txt
git commit -m "add NewFile"
git push origin master
It will pop up to ask username & password ==> enter username & passowrd created ont the Gitea web portal. Now open the Gitea portal, you will see NewFile.txt.

You can use Visual Studio Code for working with your Git project.
Have a fun when reading. Bye!

Monday, February 24, 2020

Git Server on Windows with OpenSSH, Remote and Local Repository

1. What is Git Server?
It is a server installed Git service. In which, Git is a distributed version control system designed to handle everything from small to very large projects with speed and efficiency.
In this article, I will guide you step by step to setup a Git Server on Windows with OpenSSH.

2. What is Remote & Local Repository?
Remote Repository is a repository on a server where source codes from developers are centralized. While Local Repository is a repository cloned (copied) from Remote Repository to developer's computer (client).
The following picture will illustrate how repositories working.


3. Required tools
+Win32 OpenSSH
+Git for Windows

4. Install Git for Windows
Go to Git for Windows, select & download suitable version for your Windows (32-bit or 64-bit).
Installing it with option "Use Git and optional Unix tools from the Command Prompt" and "Use the OpenSSL library".


After installing, open Windows cmd or Git bash run below command to check if it is installed ok:
git --version
5. Install OpenSSH
Go to Win32 OpenSSH, select & download a suitable version for your Windows. Unpack it to a folder (e.g. C:\OpenSSH).
Run Windows PowerShell as Administrator right, change to the OpenSSH folder, then run below command to install:
powershell -ExecutionPolicy ByPass -File install-sshd.ps1
See the following picture for more details:


Open Windows Services then set OpenSSH SSH Server & OpenSSH Authetication Agent to Automatic  and start them.

Because OpenSSH use port 22 by default, so you must open this port on your Windows firewall. You can change the SSH service port value (e.g. Port 1235) in its config file: C:\OpenSSH\sshd_config_default. If you change the port, remember open the firewall for new port and restart SSH services.

To check if the OpenSSH server is working, on a client computer download PuTTY tool and connect to the SSH server via its IP and a Windows user on the server.
In case your client computer already had ssh client, you can use Windows cmd to connect to the server. If your client doesn't have, you can install Win32 OpenSSH on the client. See below picture for sample of checking SSH connection.

Every time you connect to the SSH server, it requires to input password. To avoid password, you can use Public & Private keys for authenticating. Let generate these keys on your clients by using ssh-keygen tool, for example:
ssh-keygen -t rsa -b 4096
It will generate 2 files: id_rsa and id_rsa.pub in SSH folder of Windows user on the client (C:\Users\<username>\.ssh). Remember let passphrase as empty (key enter) when it asks you key in, it will help you skip to enter passphrase every time you connect to the server. Copy id_rsa.pub file to the SSH folder of Windows user on the server (C:\Users\<username>\.ssh) and rename it to authorized_keys. Then on the server, right click on this file and make sure removing rights of all users except Administrators and SYSTEM, for example:


On the server, verify if file C:\ProgramData\ssh\sshd_config (file config of SSH service) has below lines uncommented:
PubkeyAuthentication yes
AuthorizedKeysFile .ssh/authorized_keys
If not, let uncomment them then restart OpenSSH SSH Server. Try again with ssh username@computername_or_IP, it will login to SSH Server without entering any password/passphrase.

6. Create Remote Repository (central repo)
On the server, for existing source folder, you can run below commands from Windows cmd:
cd D:\mygit\my_central_repo
git init --bare
Or create new central repo by command:
git clone --bare D:\mygit\my_central_repo
On the client, create a folder and add remote repository into:
cd E:\local_repo
git init
git remote add origin hunglv@192.168.10.101:D:/mygit/my_centro_repo
In which origin is a name standfor remote repo. Next you must run 2 below work arround commands to set powershell as default Shell in registry:
git config --local remote.origin.uploadpack "powershell git-upload-pack"
git config --local remote.origin.receivepack "powershell git-receive-pack"
Now you can fetch remote repo to your local repo for working:
git fetch origin
OK, you have done the setup for Git Server on Windows with OpenSSH, Remote and Local Repository. Next is common Git commands that are often used.

7. Basic Git commands
git fetch <remote name> <branch>: fetching repo versioning data from remote repo to local repo
git pull <remote name> <brannch>: get all (included new files & merge updated files) from remote repo to local
git add <file>: add new file to local repo
git commit -m <"message">: commit all updates / news to your local repo
git push <remote> <branch>: push all updates / news from your local repo to remote repo
git remote -v: see remote repo linked
git status: check status / changes in local repo

The end for this article. Hope you can start your projects on Git easily.
Any comment is welcome. Bye!

Sunday, March 17, 2019

Learning Ionic 4 - Part 3

In this Part 3, we will focus on adding a component into page, working with ionic components, using SCSS, and rolling numbers to play games.

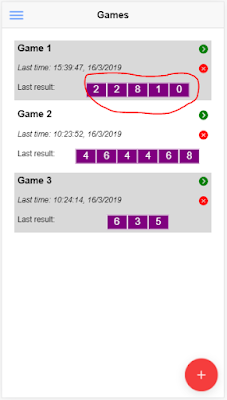
According to the mockup, we have an array of numbers which appears on pages: Games (Home), Play Games and History. Below is my Home page after finishing:

So creating a component presenting array of numbers for reusing in pages is a good idea. Let generate this component:
ionic g component components/NumbersPanel
It will generate files:
src/app/components/numbers-panel/numbers-panel.component.html
src/app/components/numbers-panel/numbers-panel.component.spec.ts
src/app/components/numbers-panel/numbers-panel.component.ts
src/app/components/numbers-panel/numbers-panel.component.scss


Modify numbers-panel.component.ts as below:
import { Component, OnInit, Input } from '@angular/core';
@Component({
  selector: 'app-numbers-panel',
  templateUrl: './numbers-panel.component.html',
  styleUrls: ['./numbers-panel.component.scss']
})
export class NumbersPanelComponent implements OnInit {
  @Input() numbers: any = [];
  @Input() minval: number;
  @Input() maxval: number;
  constructor() {
  }
  ngOnInit() {
  }
}
Modify numbers-panel.component.html as below:

<div class="box-number-outline">
  <div class="box-number" *ngFor="let n of numbers">{{n}}</div>
</div>
Modify numbers-panel.component.scss as below:

.box-number-outline {
    text-align: center;
}
.box-number {
    width: 35px;
    height: 25px;
    background-color: purple;
    display: inline-block;
    border: solid 1px white;
    color: white;
    padding-top: 2px;
}
To allow this component used in pages, let create a file src\app\components\components.module.ts and add below code (this file can be created with the command ionic g module components/components, however I got error 'Tree type is not supported' - ng cli error so I created it manually):

import { NgModule } from '@angular/core';
import { NumbersPanelComponent } from './numbers-panel/numbers-panel.component';
import { IonicModule } from '@ionic/angular';
import { CommonModule } from '@angular/common';
@NgModule({
    declarations: [NumbersPanelComponent],
    imports: [CommonModule , IonicModule],
    exports: [NumbersPanelComponent]
})
export class ComponentsModule {}
OK, we already had our component, let use it in Home page by declaring some things in src\app\home\home.module.ts:

...
import { ComponentsModule } from '../components/components.module';
...
@NgModule({
  imports: [
    ...
    ComponentsModule,
    …
Below is new code of src\app\home\home.page.ts:

import { Component, OnInit } from '@angular/core';
import { AuthService } from '../services/auth.service';
import { MyTablesService } from '../services/my-tables.service';
import { NavController, AlertController } from '@ionic/angular';
@Component({
  selector: 'app-home',
  templateUrl: './home.page.html',
  styleUrls: ['./home.page.scss'],
})
export class HomePage implements OnInit {
  games: any = [];
  history: any = [];
  constructor(
    private auth: AuthService,
    private tableService: MyTablesService,
    private navCtrl: NavController,
    private alertCtrl: AlertController
  ) { }
  ngOnInit() {
    this.auth.loggedin().then(isLoggedin => {
      if (!isLoggedin) {
        this.navCtrl.goRoot('/login');
      }
    });
  }
  ionViewWillEnter() {
    this.loadGames();
  }
  loadGames() {
    this.tableService.getItems('games').then((d) => {
      this.games = d;
      this.tableService.getItems('history').then((h) => {
        this.history = h;
        for(let game of this.games) {
          let gh = this.tableService.getItemByField(this.history, 'game_id', game.id);
          if(gh.length > 0) {
            gh.sort(this.tableService.sortDescByField('play_time'));
            game.last_play_time = new Date(gh[0].play_time).toLocaleString('vi-VN');
            game.last_result = JSON.parse(gh[0].result);
          }
        }
      });
    });
  }
  newGame() {
    this.navCtrl.goForward('/new-game');
  }
  playGame(game_id) {
    this.navCtrl.goForward(`/play-game/${game_id}`);
  }
  async deleteGame(game_id) {
    let alert = await this.alertCtrl.create({
      message: 'Do you want to delete this game?',
      buttons: [
        {
          text: 'Cancel',
          role: 'cancel',
          handler: () => {
          }
        },
        {
          text: 'OK',
          handler: () => {
            this.tableService.setItem('games', game_id, 'deleted', true);
          }
        }
      ]
    });
    await alert.present();
  }
}
And new code of src\app\home\home.page.html:

<ion-header>
  <ion-toolbar>
    <ion-buttons slot="start">
      <ion-menu-button></ion-menu-button>
    </ion-buttons>
    <ion-title>Games</ion-title>
  </ion-toolbar>
</ion-header>
<ion-content padding>
  <ion-grid *ngFor="let game of games; let i = index;">
    <div [ngClass]="(i % 2 == 0) ? 'grid_odd' : 'grid_even'" *ngIf="!game.deleted">
        <ion-row>
          <ion-col size="11">
            <b>{{game.name}}</b>
          </ion-col>
          <ion-col size="1">
            <div class="play_icon">
              <ion-icon name="arrow-dropright-circle" style="zoom:1.2;" (click)=playGame(game.id)></ion-icon>
            </div>
          </ion-col>
        </ion-row>
        <ion-row>
          <ion-col size="11">
            <div class="last_play_time" *ngIf="game.last_play_time">
              Last time: {{game.last_play_time}}
            </div>
            <div class="last_play_time" *ngIf="!game.last_play_time">
              Haven't been played yet. Let play.
            </div>
          </ion-col>
          <ion-col size="1">
            <div class="delete_icon">
              <ion-icon name="close-circle" style="zoom:1.2;" (click)=deleteGame(game.id)></ion-icon>
            </div>
          </ion-col>
        </ion-row>
        <ion-row>
          <ion-col size="3">
            <div class="last_result" *ngIf="game.last_play_time">
                Last result:
            </div>
          </ion-col>
          <ion-col size="9">
            <app-numbers-panel [numbers]="game.last_result"></app-numbers-panel>
          </ion-col>
        </ion-row>
    </div>
  </ion-grid>
   
  <ion-fab vertical="bottom" horizontal="end" slot="fixed">
    <ion-fab-button color="danger" (click)="newGame()">
      <ion-icon name="add"></ion-icon>
    </ion-fab-button>
  </ion-fab>
</ion-content>
Pay your attention on the code <app-numbers-panel [numbers]="game.last_result"></app-numbers-panel> : ==> it will show the NumbersPanel component and put the last result of game to the component for displaying.

On above html file, I also make alternate color for game rows, watch the code: [ngClass]="(i % 2 == 0) ? 'grid_odd' : 'grid_even'".

At this time, your Home page can list games but won't have any info about last playing result of games. So let generate PlayGame page and play, run the command:

ionic g page PlayGame
Modify src\app\play-game\play-game.page.ts as below:

import { Component, OnInit } from '@angular/core';
import { ActivatedRoute } from '@angular/router';
import { History,  MyTablesService } from '../services/my-tables.service';
import { delay } from 'q';
@Component({
  selector: 'app-play-game',
  templateUrl: './play-game.page.html',
  styleUrls: ['./play-game.page.scss'],
})
export class PlayGamePage implements OnInit {
  game: any;
  numbers: any = [];
  history: History;
  curTime: any;
  played: boolean = false;
  constructor(
    private activeRoute: ActivatedRoute,
    private tableService: MyTablesService) {
      this.curTime = new Date().toLocaleString('vi-VN');
      this.history = new History();
      let game_id = this.activeRoute.snapshot.paramMap.get('id');
      this.tableService.getItem('games', game_id).then((d) => {
        this.game = d;
        for(let i=0; i < this.game.numbers; i++) {
          this.numbers.push(-1);
        }
      });
  }
  ngOnInit() {
  }
  async startGame() {
    for(let i = 1; i < 3; i++) {
      for(let j = this.game.min_number; j <=  this.game.max_number; j++) {
        for(let k=0; k < this.game.numbers; k++) {
          this.numbers[k] = j;
        }
        await delay(200);
      }
    }
   
    for(let i=0; i < this.game.numbers; i++) {
      this.numbers[i] = Math.floor(Math.random() * this.game.max_number) + this.game.min_number;
    }
    this.saveHistory();
    this.played = true;
  }
  saveHistory() {
    this.history.play_time = new Date();
    this.history.game_id = this.game.id;
    this.history.result = JSON.stringify(this.numbers);
    this.tableService.addItem('history', this.history);
  }
}
Modify src\app\play-game\play-game.page.html as below:

<ion-header>
  <ion-toolbar>
    <ion-buttons slot="start">
      <ion-menu-button></ion-menu-button>
    </ion-buttons>
    <ion-title>Play Game</ion-title>
  </ion-toolbar>
</ion-header>
<ion-content padding>
  <div *ngIf="game" style ="text-align: center; padding: 10px;">
    <b>{{game.name}}</b><br>
    <i>{{curTime}}</i><br>
  </div>
  <app-numbers-panel [numbers]="numbers"></app-numbers-panel>
  <div style ="text-align: center; padding: 10px;">
      <ion-button size="default" shape="round" color="secondary" (click)="startGame()" [disabled]="played">
        Start
      </ion-button>
  </div>
</ion-content>
In the function startGame(), I roll numbers from its min to max and delay 200ms when changing numbers. It is done 2 times and finished by randomizing numbers between its min & max. This is how I make the animation for rolling numbers -:)

Yeah! Now we can create games, play them and have a fun. See how I play a game:


After playing, we may need to see the history of playing games. It's time to code the History page.
Modify src\app\history\history.page.ts as below:

import { Component, OnInit } from '@angular/core';
import { AuthService } from '../services/auth.service';
import { MyTablesService } from '../services/my-tables.service';
import { NavController } from '@ionic/angular';
@Component({
  selector: 'app-history',
  templateUrl: './history.page.html',
  styleUrls: ['./history.page.scss'],
})
export class HistoryPage implements OnInit {
  games: any = [];
  history: any = [];
  items: any = [];
  keywords: string = '';
  showSearchBar: boolean = true;
  constructor(
    private auth: AuthService,
    private tableService: MyTablesService,
    private navCtrl: NavController) { }
    ngOnInit() {
      this.auth.loggedin().then(isLoggedin => {
        if (!isLoggedin) {
          this.navCtrl.goRoot('/login');
        }
      });
    }
 
    ionViewWillEnter() {
      this.loadGames();
    }
 
    loadGames() {
      this.tableService.getItems('games').then((d) => {
        this.games = d;
        this.items = d;
        this.tableService.getItems('history').then((h) => {
          this.history = h;
          for(let game of this.games) {
            let gh = this.tableService.getItemByField(this.history, 'game_id', game.id);
            game.pcount = gh.length;
          }
        });
      });
    }
    searchGames() {
      this.items = this.games.filter((item) => {
        return item.name.toLowerCase().indexOf(this.keywords.toLowerCase()) > -1;
      });
    }
    toggleSarchBar() {
      this.showSearchBar = !this.showSearchBar;
    }
    showGameHistory(game_id) {
      this.navCtrl.goForward(`/game-history/${game_id}`);
    }
}
Modify src\app\history\history.page.html as below:

<ion-header>
  <ion-toolbar>
    <ion-buttons slot="start">
      <ion-menu-button></ion-menu-button>
    </ion-buttons>
    <ion-title>History</ion-title>
    <ion-buttons slot="end">
      <div class="button">
        <ion-icon name="search" style="zoom:1.2;" (click)="toggleSarchBar()"></ion-icon>
      </div>
    </ion-buttons>
  </ion-toolbar>
</ion-header>
<ion-content padding>
  <div *ngIf="showSearchBar" [hidden]="!showSearchBar">
      <ion-searchbar [(ngModel)]="keywords" (ionChange)="searchGames()" placeholder="Filter games" debounce="1000"></ion-searchbar>
  </div>
  <ion-grid *ngFor="let game of items; let i = index;">
    <div [ngClass]="(i % 2 == 0) ? 'grid_odd' : 'grid_even'" *ngIf="!game.deleted" (click)="showGameHistory(game.id)">
      <b>{{game.name}}</b><br/>
      <i>Created time: {{game.created_time}}</i><br/>
      Played: {{game.pcount}} times
    </div>
  </ion-grid>
</ion-content>
There is a tricky that I used to make the icon search can be clicked on the tool bar, that is wrapping the icon with <div class="button">. Without class="button", we cannot click on the icon. I don't know if it is normal behavior of Ionic 4 or a bug.

The search bar (ion-searchbar) also is set debounce="1000" to avoid filter immediately when keying. This debounce="1000" means if you stop keying in 1 second, the input value will be fired to ionChange event.

The last page is GameHistory page to show all playing history of a game. Let generate it:

ionic g page GameHistory
This page will use the NumbersPanel component, so let import ComponentsModule to its module file src\app\game-history\game-history.module.ts.

Basically, coding of this page is nearly same with other pages we done, except that it has new component for rating playing results. But I want to keep this for next article.

In next article, we may study how to make general CSS applied for all pages and code a rating component.

I hope that through Part 1 - Part 2 - Part 3, you can start to code your real application with Ionic 4. In case you want grab the source code, let check https://github.com/vnheros/GameLot on my GitHub.

See you. Any comment is welcome!


Subscribe to RSS Feed Follow me on Twitter!